
Last updated: Oct 20, 2026
Board and Batten Calculator

A complete board-and-batten planning chain — from board count and spacing through layout, room totals, real materials, siding, cost, paneling and fencing. Every card runs independently, and calculating one card auto-suggests values for the next.
Basic Board & Batten Wall Calculator
Enter your wall size and target gap. This returns exactly how many battens fit flush at both corners, with the gap evenly redistributed so it never looks lopsided.
Spacing Calculator
Already know how many boards you want? Solve directly for the exact gap that keeps everything even, instead of working from a target spacing.
Layout & Design Planner Calculator
Real walls have doors and windows. This re-flows the clean math from Cards 1–2 around your openings so the plan matches the actual wall.
| Segment | Width | Boards | Spacing |
|---|
Accent Wall Calculator
The single-feature-wall use case — pick a style preset instead of guessing at inches, and get a paint estimate alongside the board count.
Wainscoting Calculator
The lower-wall-height variant — battens run from the baseboard up to a chair-rail or cap height instead of floor to ceiling.
Grid / Square Pattern Calculator
The two-directional decorative pattern — vertical and horizontal battens forming a grid of squares, a high-end accent look.
Interior Room Calculator
Scales the per-wall layout logic up to an entire room — multiple walls, corners and openings totaled into one shopping list.
| Wall | Width×Height | Boards | Linear Ft |
|---|
Material-Specific Calculator (Vinyl / Hardie / Wood)
Converts the abstract board count into a real shopping list for an actual product — each sold in different fixed sizes.
Board & Batten Siding Calculator (Exterior)
The same core math scaled to an exterior wall or full house — with furring strips and a moisture barrier that interior walls don't need.
Siding / Project Cost Calculator
Turns the finished material list from any upstream card into an actual dollar figure — material, labor, and a DIY-vs-contractor comparison.
Paneling Calculator
The faster-install alternative to individual boards — prefab sheets compared side by side against the board-by-board route.
Fence Calculator
The same board-and-batten spacing math applied to a privacy fence — vertical battens over horizontal rails between posts.
Board and Batten Calculator and Guide: Spacing, Styles, Materials, and Cost
Published by IntelCalculator. Written and reviewed by Muhmmad Shoaib Urbn & Infrastructure Planning Expert. Read the editorial policies and about IntelCalculator.
A board and batten calculator finds the number of battens and the exact even gap for a wall. The manual method is n = round((W + G) / (B + G)), then gap = (W – (n * B)) / (n – 1). W is the wall width. B is the actual batten width, and a 1×4 measures 3.5 inches. G is the gap you want. A 144 inch wall with 3.5 inch battens and a 14 inch target gap needs 9 battens with an even gap of 14 1/16 inches. Classic layouts use gaps of 12 to 16 inches. Jump to Section 5.1 to open the board and batten wall calculator.
Key takeaways
- Use actual lumber sizes. A 1×4 is 3.5 inches wide and a 1×3 is 2.5 inches wide (American Softwood Lumber Standard, NIST PS 20).
- Decide whether your spacing target is a clear gap or an on-center distance. They differ by exactly one batten width.
- Every layout must pass one check: (n * B) + ((n – 1) * gap) = W.
- Trim cost per square foot of wall = price per linear foot * 12 / center-to-center spacing in inches.
- Exterior board and batten siding must follow the manufacturer instructions and your local building code.
What is board and batten?
Definition and parts
Board and batten is a vertical wall or siding layout made of boards and battens. A batten is a narrow vertical strip. A board is a wide vertical panel. In the classic exterior form, wide boards form the wall surface and battens cover the seams between them. In the interior form, called a batten wall, narrow battens sit on a painted wall at even intervals and create deep shadow lines.
This guide uses “batten” for the narrow strip and “board” for the wide panel behind or between battens. The calculators say “board width” for the actual width of the strip being spaced.
Other names, near-miss terms and definitions
- Other names: board-and-batten, batten board paneling, vertical board and batten, batten wall, board and batten wall. If you searched “board and baton” or “board and batton”, the correct term is batten.
- Shiplap: horizontal boards with overlapping or rabbeted edges that sit flat. It is a different look from board and batten.
- Wainscoting: any treatment that covers only the lower part of a wall. Board and batten wainscoting is one type.
- Picture frame molding: applied rectangular frames. It relates to the grid pattern in Section 5.6.
- Gap (clear gap): the open space between the edges of two neighboring battens.
- Center-to-center (on-center, O.C.): the distance from the middle of one batten to the middle of the next. It equals the gap plus the batten width.
- Nominal size: the name of a lumber size, such as 1×4. Actual size: the real measurement, 3/4 inch by 3 1/2 inches.
- Linear foot (also called lineal foot): one foot of length of any trim, whatever its width.
- MDF: Medium-Density Fiberboard, an engineered wood made from wood fibers and resin.
- PVC: polyvinyl chloride, the plastic in cellular PVC trim.
A short history
Vertical board and batten is an old North American building method. Wide boards shrink and swell with moisture, so builders nailed narrow battens over the seams to shed rain and block wind. The style spread through 19th-century American house design, including Andrew Jackson Downing’s Cottage Residences (1842). Today the same look suits rustic and ultra-modern homes.
Wood movement explains the design. A wide board changes width as humidity changes, and the batten hides the resulting gap. That is why exterior boards are fastened to allow movement, and why interior MDF behaves differently from solid wood.
Interior vs exterior applications
Exterior board and batten siding is a weather barrier. It needs a water-resistive barrier (house wrap), flashing at openings and at the base of the wall, and a path for water and air behind the siding. These details must follow the siding manufacturer instructions and the locally adopted code, such as the International Residential Code (IRC) exterior wall covering provisions.
Interior board and batten is a decorative accent for living rooms, dining rooms, bedrooms and entryways. It needs no weatherproofing, so the work is layout, joinery, caulk and paint. A board and batten accent wall is the most common interior project.
Why precise layout matters
The eye reads even rhythm as quality. A guessed layout often leaves a sliver or an oversized gap at one corner. Calculating from the actual wall width spreads the gaps evenly from corner to corner. It also produces a precise cut list, which cuts waste at the lumberyard.
How to calculate board and batten spacing
Board and batten spacing is the gap between battens. The calculation has three inputs: wall width, actual batten width and target gap. Everything else follows from them.
Nominal vs actual size
Lumber is sold by nominal size and measured by actual size. Under the American Softwood Lumber Standard (NIST PS 20), a dry 1×3 is about 2.5 inches wide, a 1×4 is 3.5 inches, a 1×6 is 5.5 inches and a 1×8 is 7.25 inches. Thickness is about 3/4 inch. Using 4 inches instead of 3.5 inches for a layout with 11 battens adds 5.5 inches of error across the wall. Convert mixed measurements with the feet and inches converter. For metric plans, use the inches to centimeters converter.
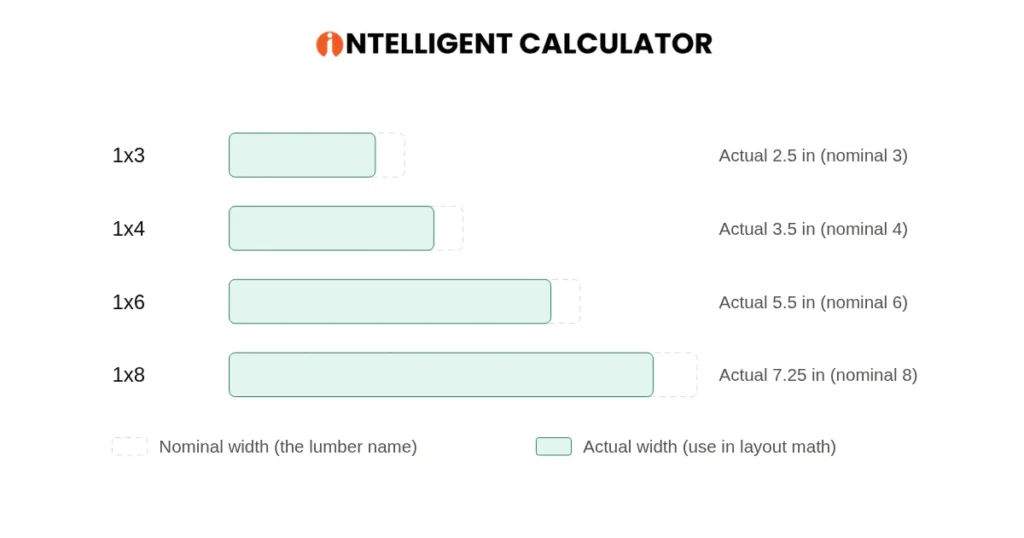
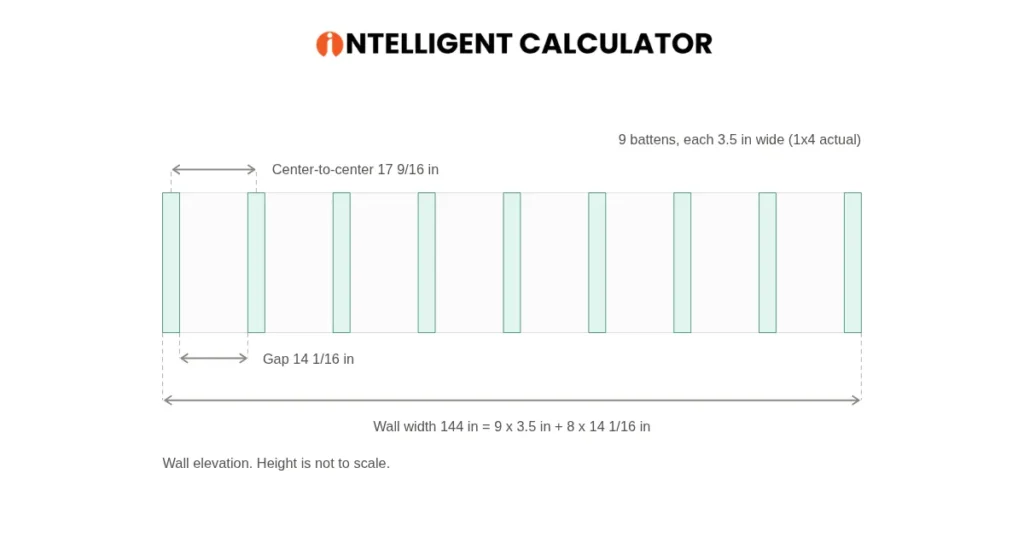
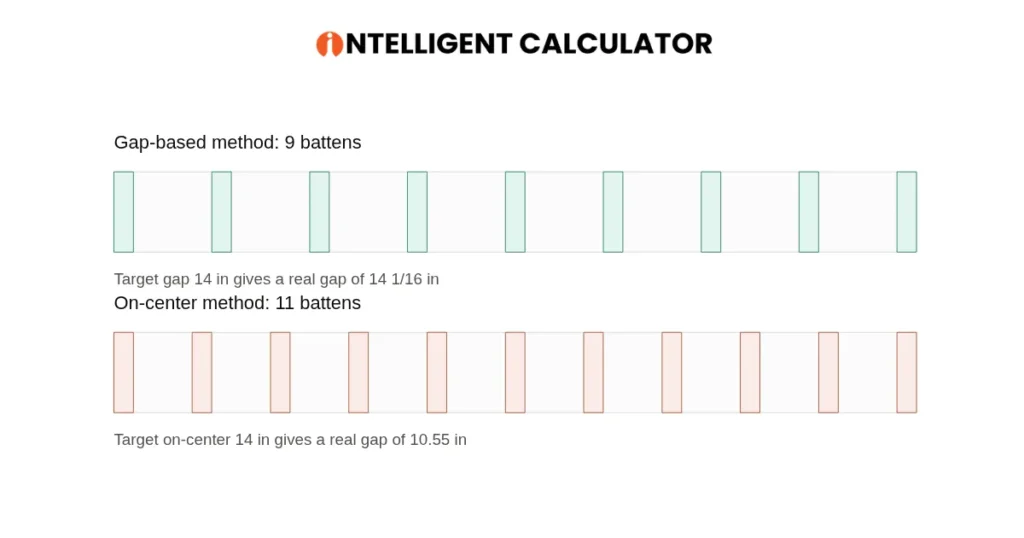
Figure 3. The same 144 inch wall laid out two ways.
How high should board and batten go?
There is no building-code rule for the height of interior decorative trim. Wainscot-style board and batten usually runs 32 to 48 inches from the floor. Full height up to the ceiling is also common. Align the top rail with something already in the room, such as a window sill, chair rail or headboard. On an 8 foot wall, 32 to 36 inches is a typical wainscot height. Board and batten does not have to run full height.
Windows, doors, outlets, studs and corners
- Windows and doors: split the wall into segments between openings and calculate each one separately. Or center a batten on the opening and work outward. The Layout Planner in Section 5.3 does this.
- Outlets and switches: a batten that covers a box needs an electrical box extender, or the batten must move. Turn off power before removing cover plates.
- Studs: wall studs are commonly 16 inches on-center, though other spacings exist. Mark them first. Battens do not have to land on studs, but nailing into a stud holds better. Plan stud locations with the framing calculator for stud layout.
- Corners: walls are rarely plumb. Measure the width at several heights and use the smallest number.
- Edge cases: vaulted or sloped ceilings, walls beside stairs, textured drywall and unlevel ceilings need a laser level and extra measurements. The suite does not model them.
The 14 design styles
A style fixes the gap range, batten width and finish of a board and batten wall. Gaps that are too tight make a small room feel crowded. Gaps that are too wide make a large wall look bare. The ranges below are clear gaps between battens, and each calculator preset fills them in.
Style comparison table
Gap ranges run from 8 to 11 inches for Victorian, the tightest, to 20 to 26 inches for Industrial, the widest. Batten widths run from 2.5 inches for Scandinavian to 7.25 inches for Rustic. The most common batten width is 3.5 inches, used by 8 of the 14 styles.
| Style | Gap range | Batten width | Visual impact | Best finish |
|---|---|---|---|---|
| Modern | 18 to 24 in | 3.5 in | Minimalist and contemporary | Flat or matte paint |
| Classic | 12 to 16 in | 3.5 in | Balanced and timeless | Satin or eggshell |
| Farmhouse | 14 to 18 in | 5.5 in | Bold, country, rustic | Chalk or low-sheen |
| Coastal | 16 to 20 in | 3.5 in | Light, breezy, relaxed | Soft semi-gloss |
| Craftsman | 10 to 14 in | 5.5 in | Substantial and structural | Rich wood satin |
| Shaker | 12 to 14 in | 3.5 in | Understated and orderly | Matte finish |
| Scandinavian | 16 to 22 in | 2.5 in | Nordic linear minimalism | Clear coat or white |
| Industrial | 20 to 26 in | 3.5 in | Raw loft utility | Charcoal or dark gray |
| Traditional | 10 to 12 in | 3.5 in | Dense, formal, stately | Classic semi-gloss |
| Transitional | 13 to 16 in | 4.5 in | Blended and versatile | Soft eggshell |
| Rustic | 16 to 22 in | 7.25 in (1×8 board or wide batten) | Heavy wood-cabin look | Semi-transparent stain |
| Mediterranean | 14 to 18 in | 5.5 in | Warm plaster accentuation | Warm terracotta or cream |
| Victorian | 8 to 11 in | 3.5 in | Dense, ornate, decorative | High-gloss premium |
| Mid-Century | 18 to 22 in | 3.5 in | Retro horizontal balance | Natural warm stains |
Style notes
- Modern: wide, airy gaps and square-edge battens with no decorative profile. It suits open-concept homes with high ceilings.
- Classic: the safe, balanced choice, based on traditional American trim proportions.
- Farmhouse: wider battens that ground a room. It works with light paint and dark fixtures.
- Coastal: mid-to-wide gaps in crisp white, soft cream or pale ocean tones. It works best in bright rooms.
- Craftsman: chunky wood with heavy top caps, rooted in the early 20th-century Arts and Crafts movement.
- Shaker: simple, uniform spacing with no chamfers or decorative detail.
- Scandinavian: thin strips, generous gaps and light wood or flat white. It helps small rooms feel larger.
- Industrial: wide, bold spacing for loft walls, paired with brick or matte black metal.
- Traditional: dense spacing for formal rooms, with deep shadow lines.
- Transitional: between traditional and modern, with mid-range dimensions.
- Rustic: massive rough-sawn boards for cabins and mudrooms. Stain suits it better than paint.
- Mediterranean: broad spacing and thick, smooth boards, paired with warm earth tones.
- Victorian: tight, ornate spacing with deep profiles and elaborate caps.
- Mid-Century: wide, repeating vertical lines that emphasize the length of a wall.
How to pick a style
Start with ceiling height and room size. Tall walls and big rooms handle wide gaps (Modern, Industrial, Mid-Century). Small rooms look better with narrow battens and generous gaps (Scandinavian), or with dense spacing used on one feature wall (Victorian, Traditional). Then match the paint and finish to the table. The board and batten accent wall calculator in Section 5.4 loads any of these presets.
Materials and cost
Material choice sets total cost, install time and maintenance. The prices below are the original 2026 estimates carried over from the earlier version of this guide. They are not a measured survey. Confirm current prices locally. Lumber sold by volume can be converted with the board foot calculator.
Material comparison table
Exterior siding materials are priced per square foot, from about USD 2.50 for pressure-treated pine to USD 16.00 for redwood. Interior and trim materials are priced per linear foot, from about USD 0.80 for birch plywood strips to USD 7.50 for red oak. Lifespans and maintenance vary by manufacturer and climate.
| Material | Use | Price (USD) | Lifespan | Maintenance |
|---|---|---|---|---|
| Vinyl siding | Exterior | 3.50 to 6.50 per sq ft | 20 to 30 years | Extremely low |
| Fiber cement (for example James Hardie) | Exterior | 6.00 to 11.50 per sq ft | 50+ years | Low (repaint about every 15 years) |
| Engineered wood (for example LP SmartSide) | Exterior | 5.50 to 9.50 per sq ft | 30 to 50 years | Low to medium |
| Natural cedar | Exterior | 8.00 to 14.00 per sq ft | 25 to 40 years | High (stain every 3 to 5 years) |
| Pressure-treated pine | Exterior and fences | 2.50 to 5.00 per sq ft | 15 to 25 years | Medium (regular water sealing) |
| Redwood | Exterior | 9.00 to 16.00 per sq ft | 30 to 50 years | High (UV sealing) |
| Extruded aluminum | Exterior | 9.50 to 15.00 per sq ft | 40 to 50 years | Low |
| Primed MDF | Interior only | 1.20 to 2.80 per linear ft | Long if kept dry | Very low |
| Cellular PVC trim | Interior or exterior | 3.50 to 7.00 per linear ft | 50+ years | Extremely low |
| Birch plywood strips | Interior only | 0.80 to 1.70 per linear ft | Long if kept dry | Low |
| Clear white pine | Interior only | 1.80 to 3.20 per linear ft | Long if kept dry | Low |
| Poplar | Interior only | 2.20 to 4.50 per linear ft | Long if kept dry | Low |
| Red oak | Interior only | 4.00 to 7.50 per linear ft | Long if kept dry | Low to medium |
| Composite trim stock | Exterior accents | 3.00 to 5.50 per linear ft | 25 to 40 years | Low |
Board and batten cost per square foot
Board and batten cost per square foot of wall is the batten price per linear foot times 12, divided by the center-to-center spacing in inches. At 17.5 inches, a wall needs 0.686 linear feet of batten per square foot. Use the linear foot calculator for trim lengths to convert your own wall.
At midpoint prices, battens alone cost about USD 0.86 per square foot for birch plywood strips and about USD 3.94 for red oak. These figures exclude rails, adhesive, caulk, paint and labor.
| Material (midpoint USD per linear ft) | Battens-only cost per sq ft of wall (USD) |
|---|---|
| Birch plywood strips (1.25) | 0.86 |
| Primed MDF (2.00) | 1.37 |
| Clear white pine (2.50) | 1.71 |
| Poplar (3.35) | 2.30 |
| Composite trim (4.25) | 2.91 |
| Cellular PVC (5.25) | 3.60 |
| Red oak (5.75) | 3.94 |
Choosing a material by scenario
- Dry interior, painted: primed MDF for the lowest cost and a smooth finish, or poplar for dent resistance.
- Interior, stained: clear white pine or red oak for visible grain. Poplar can show green or purple streaks, so keep it painted.
- Bathroom, mudroom or laundry: cellular PVC trim, which is waterproof. Keep MDF away from direct water.
- Exterior, low maintenance: fiber cement or vinyl.
- Exterior, natural look: cedar or redwood, with regular sealing or staining.
- Fence: pressure-treated pine, using lumber rated for the exposure.
Material notes and cautions
- Vinyl: expands and contracts with temperature, so fasten loosely to prevent warping.
- Fiber cement: heavy, needs specialized blades, and cutting releases silica dust. Follow the OSHA respirable crystalline silica standard (29 CFR 1926.1153) and the manufacturer instructions.
- Engineered wood: seal cut edges against moisture, as the manufacturer requires.
- Cedar and redwood: use stainless steel or hot-dip galvanized fasteners. Redwood supply varies by region.
- MDF: swells when it absorbs water, so prime every cut edge. Sealed MDF can work in damp rooms but carries risk, so PVC is the safer choice.
- Aluminum: lightweight and fireproof, but it can dent on impact.
- Cellular PVC: expands more than wood, so glue joints properly and leave expansion allowances. Not all PVC trim is the same, so check the product’s temperature and color ratings.
The 12-tool calculator suite
The suite covers every phase of a project: layout, spacing, openings, paint, wainscoting, grids, whole rooms, purchasing, exterior siding, cost, paneling and fences. W is wall width, B is actual batten width, G is target gap, T is the target spacing typed into the tool, H is height and n is batten count. The tools are not tied to one wall. A result in Card 1 fills matching fields in the later cards.
Board and batten wall calculator (Card 1)
This is the board and batten spacing calculator for a full wall. It returns the batten count, the exact gap and the linear footage.
- Inputs: units (inches, centimeters or feet), wall width, wall height, batten width (presets such as 1×3 = 2.5 in and 1×4 = 3.5 in, or custom), target spacing.
- Outputs: battens needed, actual spacing, total batten linear feet, top rail and base rail length.
- Formula in the suite: n = floor(W / T) + 1, then spacing = (W – n * B) / (n – 1). Batten linear feet = n * H / 12. Top rail plus base = (W / 12) * 2.
Which definition does the suite use? The suite divides the wall by T to pick the count, so T behaves like an on-center target. Default values (120 inch wall, 3.5 inch batten, T = 14) give 9 battens at 11.06 inches. The gap-based method in Section 2.3 gives 8 battens at 13.14 inches for the same wall. Both layouts pass the check line. The suite also shows center-to-center as spacing plus B. Always read the spacing result as the real gap.
Board and batten spacing calculator (Card 2)
Use this tool when you already know how many battens you want.
- Inputs: number of battens, wall width, batten width, corner rule (flush edges or centered).
- Outputs: exact spacing, coverage check, center-to-center distance, and a suggested count that gives a cleaner tape-measure number.
- Formula: flush: spacing = (W – n * B) / (n – 1). Centered: spacing = W / n – B, so each end margin is half a gap. Center-to-center = spacing + B.
Board and batten layout planner (Card 3)
The planner splits a wall around windows, doors and other openings. Pair it with the framing calculator when stud positions matter.
- Inputs: crown clearance, baseboard height, openings with width, height and position.
- Outputs: batten counts per segment and an itemized cut list.
- Formula: usable height = H – crown clearance – baseboard height. Each segment uses the Card 1 engine on its own width.
Board and batten accent wall calculator (Card 4)
This tool applies one of the 14 style presets and estimates paint. For general coverage by the gallon, use the paint calculator for primer and two coats.
- Inputs: style preset, wall width and height, paint estimate on or off.
- Outputs: batten count and spacing, paintable area, paint gallons.
- Formula for two coats: paintable area (sq ft) = ((W * H) + (2 * t * n * H)) / 144, where t = 0.75 inch. Gallons = (area * coats) / coverage per gallon. A common label figure is 350 sq ft. The suite’s quick estimate adds 10 percent for edges and divides by 350. Use the formula above when you need two coats plus primer.
Wainscoting calculator (Card 5)
The wainscoting calculator sizes a half-height board and batten wall.
- Inputs: wainscot height (commonly 32 to 48 inches), cap rail profile (flat or shaker ledge), wall width, batten width, target spacing.
- Outputs: batten linear feet, cap rail linear feet, base rail linear feet.
- Formula: batten linear feet = n * Hw / 12, with Hw as wainscot height. Each rail = W / 12.
Grid and square pattern calculator (Card 6)
This tool builds a grid of squares or rectangles from vertical and horizontal battens.
- Inputs: target square size, pattern (even squares or custom rectangle), batten width.
- Outputs: squares formed, vertical and horizontal batten counts, total linear feet.
- Formula: squares formed = (vertical battens – 1) * (horizontal battens – 1). Total linear feet = (V * wall height / 12) + (Hb * W / 12).
Interior room board and batten calculator (Card 7)
The room calculator chains several walls into one total.
- Inputs: wall list (add as many as needed), outside corners.
- Outputs: total battens for the room and corner trim pieces.
- Formula: room battens = sum of battens per wall. Corner pieces = inside corners (walls – 1) + outside corners entered.
Material-specific board and batten calculator (Card 8)
This tool turns linear feet into boards or sheets to buy. Work out the waste share with the percentage calculator for waste allowance.
- Inputs: material, board length or panel size, waste factor (5 to 15 percent).
- Outputs: units to buy and leftover estimate.
- Formula: boards = ceil(linear feet * (1 + waste) / board length in feet). Panels = ceil(area * (1 + waste) / panel area). Choose 5 percent for straight runs and up to 15 percent for many angled cuts.
Board and batten siding calculator, exterior (Card 9)
This is the board and batten siding calculator for house exteriors. For generic siding area and panel count, use the siding calculator for wall area and panel count. For trim under the eaves, use the soffit calculator for exterior trim. Metric users can convert areas with the area converter.
- Inputs: house perimeter, wall height, openings area, furring strip spacing.
- Outputs: net siding area, furring linear feet, house wrap needed.
- Formula: net area = (perimeter * height) – openings. Furring rows = ceil(height in inches / spacing) + 1. House wrap = perimeter * height * 1.10.
Board and batten project cost calculator (Card 10)
The cost calculator rolls material, labor and paint into one budget.
- Inputs: cost per board or panel, labor rate per square foot, waste factor.
- Outputs: material cost, labor cost, grand total, cost per square foot.
- Formula: material = units * price. Labor = area * rate. Grand total = material + labor + paint.
Wall paneling calculator (Card 11)
This tool counts sheets of 4 by 8 or 4 by 10 panel and the battens that cover the seams.
- Inputs: panel size, seam treatment (butt joint or batten-covered), waste factor.
- Outputs: full sheets and seam batten linear feet.
- Formula: sheets = ceil(W * H * (1 + waste) / sheet area). Seams = sheets – 1. Seam battens = seams * H / 12.
Board and batten fence calculator (Card 12)
Fences are a different job from walls, so this tool stays contained here and will get its own page.
- Inputs: fence length, post spacing (commonly 6 or 8 feet), board and batten widths, rail rows (2 or 3).
- Outputs: posts, rail linear feet, boards and battens per section.
- Formula: posts = ceil(length / post spacing) + 1. Rail linear feet = length * rail rows. Battens per section use the Card 2 engine with post spacing as the width.
Calculator limitations
- The tools do not detect studs, slopes, vaulted ceilings or out-of-plumb walls. Measure those yourself.
- Results are layout and estimate tools. They do not guarantee code compliance, weatherproofing or structural performance.
- Prices, coverage and waste factors are estimates. Replace them with supplier prices and product-label values.
- Results are shown to the nearest 1/16 inch. Real cuts have saw kerf and material tolerance.
- Exterior work must follow the siding manufacturer instructions and the locally adopted code. When in doubt, hire a licensed professional.
Worked examples
Every example below is recomputed and ends with a check that battens plus gaps equal the wall width.
Interior living room accent wall (Classic style)
The wall is 144 inches wide and 96 inches tall. The battens are 1×4 MDF at 3.5 inches. The target gap is 14 inches, inside the Classic range of 12 to 16 inches.
- Step 1: n = round((144 + 14) / (3.5 + 14)) = round(9.03) = 9 battens.
- Step 2: the battens occupy 9 * 3.5 = 31.5 inches.
- Step 3: open wall space = 144 – 31.5 = 112.5 inches, shared by 8 gaps.
- Step 4: gap = 112.5 / 8 = 14.0625 inches (14 1/16). Center-to-center = 17.5625 inches.
- Check: 31.5 + (8 * 14.0625) = 144 inches.
- Material: 9 * 96 / 12 = 72 linear feet. With 10 percent waste that is 79.2 linear feet. Buy 10 eight-foot boards: 9 needed plus 1 spare.
- Paint: area = ((144 * 96) + (2 * 0.75 * 9 * 96)) / 144 = 105 sq ft. Two coats = 210 sq ft, which is 0.6 gallon at 350 sq ft per gallon. Add primer for bare MDF. For a wall that is not a rectangle, find its area with the square footage calculator for wall area.
Why this differs from the earlier version of this guide. The old version divided 144 by 14, called the result “11 gaps”, used 12 boards and got 9.27 inch gaps, outside the Classic range. If you treat 14 inches as on-center, as the suite’s engine does, the answer is 11 battens with 10.55 inch gaps.
Half-wall wainscoting for a dining room
The wall is 120 inches wide with a 36 inch wainscot. The battens are 1×3 at 2.5 inches, and the target gap is 12 inches.
- Step 1: n = round((120 + 12) / (2.5 + 12)) = round(9.10) = 9 battens.
- Step 2: gap = (120 – (9 * 2.5)) / 8 = 97.5 / 8 = 12.1875 inches (12 3/16).
- Check: 22.5 + (8 * 12.1875) = 120 inches.
- Step 3: batten length = 9 * 36 = 324 inches = 27 linear feet.
- Step 4: add one 10 foot base rail and one 10 foot cap rail. Total trim is 47 linear feet. With 10 percent waste, order about 52 linear feet.
Full house exterior siding project (illustrative)
The ranch home has a 200 foot perimeter and 10 foot walls. Assume 300 sq ft of windows and doors and battens at 12 inches on-center.
- Gross area = 200 * 10 = 2,000 sq ft. Net area = 2,000 – 300 = 1,700 sq ft. With 10 percent waste, order 1,870 sq ft.
- Battens: 200 feet * 12 / 12 = 200 battens. At 10 feet each that is 2,000 linear feet before opening deductions.
- Furring at 16 inches: 120 / 16 = 7.5, so 8 spaces plus the top line gives 9 rows. 9 * 200 = 1,800 linear feet. Horizontal strapping can block vertical drainage and airflow, so follow the siding manufacturer’s detail.
- House wrap: 2,000 * 1.10 = 2,200 sq ft. A 9 by 100 foot roll covers 900 sq ft, so plan 3 rolls .
Quick reference: battens for 8, 9 and 10 foot walls
All rows use 3.5 inch battens and the gap-based formula. A 96 inch wall at a 14 inch target gap needs 6 battens, a 108 inch wall needs 7, and a 120 inch wall needs 8.
| Wall width | Target gap | Battens | Actual gap |
|---|---|---|---|
| 96 in (8 ft) | 12 in | 7 | 11 15/16 in |
| 96 in (8 ft) | 14 in | 6 | 15 in |
| 108 in (9 ft) | 12 in | 8 | 11 7/16 in |
| 108 in (9 ft) | 14 in | 7 | 13 15/16 in |
| 120 in (10 ft) | 12 in | 9 | 11 1/16 in |
| 120 in (10 ft) | 14 in | 8 | 13 1/8 in |
Step-by-step installation
Tools and fasteners
- Tools: tape measure, laser level or 4-foot level, stud finder, miter saw, brad nailer (16 or 18 gauge is common), caulk gun, sanding block, putty knife, painter’s tape.
- Fasteners and adhesive: brad nails about 1 1/4 to 2 inches long plus construction adhesive are common trade practice for interior trim.
- Finishing: wood filler, paintable acrylic latex caulk, 220-grit sandpaper, primer, paint.
- Spacing block: a scrap cut to the exact calculated gap.
Interior installation steps
- Plan the layout. Measure the wall width at several heights and use the smallest number. Subtract baseboard and crown clearance from the height. Run the width, actual batten width and target gap through the calculator. Write down the batten count, exact gap and cut list.
- Prepare the wall. Turn off power to outlets, remove cover plates, clean the wall and fill damage. Find the studs and mark them with painter’s tape.
- Mark level reference lines. Use a laser level to mark the top and bottom of the treatment. Do not trust the floor or ceiling to be level.
- Paint the base coat. Paint the wall in its final color first, so only touch-ups remain after the battens go on.
- Install the rails. Attach the base rail and the top rail or cap with adhesive and brad nails, nailing into studs where possible.
- Mark the batten positions. Mark the exact gap across the wall. Cut a scrap block to the gap width and use it as a spacing block.
- Attach the battens. Apply adhesive to the back of each batten, press it into place against a level and fasten with brad nails.
- Fill, caulk and sand. Fill nail holes, caulk all joints with paintable acrylic latex caulk, let it cure and sand flush.
- Prime and paint. Prime bare MDF or wood edges, then apply two coats. Reinstall cover plates with box extenders where needed.
Exterior installation notes
The figure below shows the layers of an exterior board and batten wall, from the inside out.
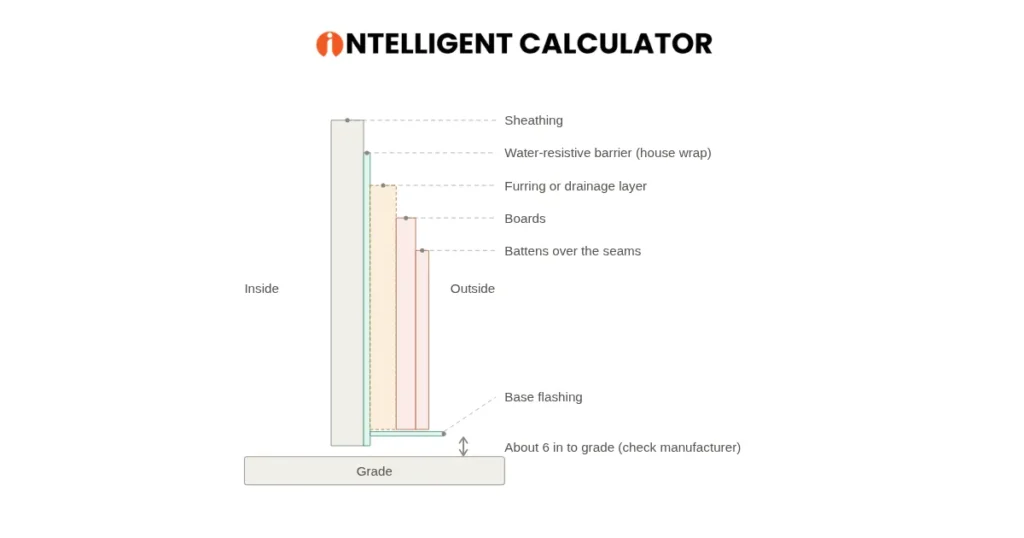
Figure 4. Exterior wall assembly.
Exterior board and batten is a weather barrier, not decoration. These notes are a checklist, not a substitute for the siding manufacturer instructions or your local code.
- Confirm the installation instructions for your exact siding product before you buy.
- Install a water-resistive barrier over the sheathing, lapped correctly, with flashing at windows, doors and the base of the wall.
- Give water a path to drain and the wall a path to dry behind the siding, as the manufacturer and code require.
- Keep siding the required distance above grade. Manufacturers such as James Hardie publish a minimum ground clearance, commonly about 6 inches.
- Use corrosion-resistant fasteners and seal cut edges where the manufacturer requires it.
- Leave expansion gaps for vinyl, PVC and composite products.
- Hire a licensed professional for second-story work or complex flashing details.
8. Board and batten vs shiplap, wainscoting and plain drywall
Board and batten is the vertical, high-shadow option and the most customizable. Shiplap is the flat horizontal option. Picture frame molding is the formal option. Plain painted drywall is the lowest-cost option because it needs no trim. Ratings below are qualitative judgments, not measured data.
| Treatment | Look | Relative cost and effort | Moisture suitability | Best for |
|---|---|---|---|---|
| Board and batten | Vertical lines, deep shadows, adjustable style | Medium: trim, layout, filling, caulk, paint | Good with PVC or sealed wood. Poor with raw MDF | Accent walls, entryways, mudrooms, exterior siding |
| Shiplap | Horizontal lines, thin flat gaps | Medium: many boards, simple layout | Depends on wood or PVC | Farmhouse and coastal rooms |
| Picture frame molding | Formal rectangles | Medium to high: many mitered corners | Good with PVC or sealed wood | Dining rooms, traditional interiors |
| Beadboard paneling | Fine vertical grooves | Low to medium: panels go up fast | Good with PVC panels | Bathrooms, cottages, wainscot |
| Plain painted drywall | Flat, plain | Lowest: no trim | Moisture-resistant board is available | Minimal rooms, tight budgets |
Board and batten does not replace drywall. It goes on top of finished drywall or sheathing, so the cost of the wall is the wall plus the added trim, adhesive, finish and labor. Planning a flooring change in the same room? Run the flooring calculator for the same room alongside this one.
9. Pro tips, common mistakes and warnings
9.1 Pro tips
- Build a physical spacing block. Cut a scrap to the exact calculated gap and use it between battens instead of re-measuring.
- Map the wall studs first. If a batten misses a stud, use construction adhesive with angled brad nails.
- Sand every joint flush. Fill and caulk where battens meet rails, then sand flat with 220-grit paper before priming. The trim will look like one piece of joinery.
- Use a laser level for the top and bottom lines. Ceilings and floors are rarely level.
- Paint the wall first and leave the trim for the final coats.
9.2 Common mistakes
- Using nominal sizes in your math. A 1×4 is 3.5 inches wide. Across 11 battens the error is 5.5 inches.
- Mixing gap and on-center. Entering an on-center value into a gap-based tool, or the reverse, changes the batten count.
- Skipping primer on MDF. Raw cut edges soak up paint and swell, leaving a rough, fuzzy finish.
- Ignoring out-of-plumb corners. Check corners with a 4-foot level and scribe the first batten to the tilt.
- Forgetting crown clearance and baseboard height. Subtract them before calculating height.
- No waste allowance. Add 5 to 15 percent, depending on how many angled cuts you expect.
- Caulking over dust. Wipe joints before caulking and sand after the filler is fully dry.
Four myths to drop. Nominal does not equal actual. Board and batten does not always go full height. MDF is not safe anywhere damp unless sealed, and even then PVC is safer. All PVC trim is not the same.
9.3 Warnings
- Electrical: turn off power before removing outlet covers, and use box extenders when trim covers a box.
- Dust: cutting fiber cement releases silica dust. Wear respiratory protection and follow manufacturer and OSHA guidance.
- Lead paint: homes built before 1978 may contain lead paint. Follow the EPA Renovation, Repair and Painting rule (40 CFR Part 745) if you disturb painted surfaces.
- Exterior work: follow the manufacturer instructions and local code, and use fall protection above ground.
- When to hire a pro: second-story siding, complex flashing and any work near electrical service.
10. Frequently asked questions
What is the standard spacing for board and batten?
Most classic layouts use a clear gap of about 12 to 16 inches between battens. Measured center to center, add the batten width. With 3.5 inch battens that is roughly 15.5 to 19.5 inches. Sources vary on whether the range is a gap or an on-center value, so confirm which one your calculator uses.
How do you calculate board and batten spacing?
Use n = round((W + G) / (B + G)) to find the number of battens. Then actual gap = (W – (n * B)) / (n – 1). W is wall width, B is actual batten width and G is your target gap. A 144 inch wall with 3.5 inch battens and a 14 inch target gap gives 9 battens and a gap of 14 1/16 inches.
How many battens do I need for a 10 foot wall?
A 120 inch wall with 3.5 inch battens and a 14 inch target gap needs 8 battens with an even gap of about 13 1/8 inches. Wider target gaps need fewer battens and narrower gaps need more, so change the target gap and recalculate.
How high should board and batten be on a wall?
Wainscot-style board and batten commonly runs 32 to 48 inches from the floor, and many designers run it full height. There is no building-code rule for interior decorative height. Line the top up with a chair rail, window sill or headboard.
What size boards are used for board and batten?
Battens are usually 1×3 or 1×4 lumber, measuring 2.5 and 3.5 inches wide. Top caps and base rails often use 1×6 or 1×8, which measure 5.5 and 7.25 inches. Actual sizes are smaller than nominal sizes under NIST PS 20.
Do you put board and batten over drywall?
Yes. Interior board and batten can go directly on smooth, existing drywall with construction adhesive and finish or brad nails, ideally into studs. Fill nail holes, caulk the joints and paint the wall and trim.
What is the difference between board and batten and shiplap?
Board and batten uses vertical boards with narrow battens that make deep shadow lines. Shiplap uses horizontal boards with overlapping or rabbeted edges that sit flat with thin gaps. Board and batten reads as vertical and structured. Shiplap reads as horizontal and flat.
How much does a board and batten accent wall cost compared with plain drywall?
Plain painted drywall needs no trim, so a board and batten wall always adds the cost of trim, adhesive, nails, filler, caulk, primer and labor. Trim cost per square foot is the price per linear foot times 12 divided by the center-to-center spacing. Trim at USD 2.00 per linear foot with 17.5 inch spacing costs about USD 1.37 per square foot before rails and paint.
Should I use wood or MDF for an interior accent wall?
Primed MDF is a common choice for painted walls because it is smooth, has no grain or knots and costs little. Use poplar, oak or clear white pine for a stain, a more dent-resistant surface, or any area where moisture could reach it. Keep MDF away from direct water.
How much paint do I need for a board and batten wall?
Paintable area is ((W * H) + (2 * t * n * H)) / 144 square feet, with t = 0.75 inch. A 144 by 96 inch wall with 9 battens is about 105 square feet. At 350 square feet per gallon, two coats need about 0.6 gallon, plus primer on bare MDF or wood. Check your product label for real coverage.
What is the best material for exterior board and batten siding?
There is no single best material. Fiber cement resists fire, rot and insects but is heavy and needs repainting. Vinyl is the lowest cost and lowest maintenance. Engineered wood is lighter than fiber cement and impact resistant. Cedar and redwood look natural but need regular sealing or staining. Follow the manufacturer instructions and local code.
Can you install board and batten on textured or uneven walls?
Yes, but the trim needs a flat, solid surface. Sand or scrape heavy texture, nail into studs where possible, and use shims or a thin backer where the wall is out of flat. Check the wall with a level or straightedge first, and scribe the first batten to any out-of-plumb corner.
11. Related tools and guides
These pages turn a wall measurement into a verified vertical trim layout, a material list and a budget. They sit in IntelCalculator’s construction calculators hub, which holds every construction calculator for walls, floors, roofs and exteriors.
- Siding calculator for wall area and panel count for the exterior side of the project.
- Paint calculator for coverage by gallon for primer and finish coats.
- Square footage calculator for wall area for irregular walls.
- Linear foot calculator for trim lengths for rails and battens.
- Framing calculator for stud layout for locating studs.
- Board foot calculator for lumber sold by volume.
- Flooring calculator for the same room for an adjacent project.
- Inches to fraction converter for turning decimal gaps into tape-measure marks.
12. Sources and methodology
- Nominal and actual lumber sizes: American Softwood Lumber Standard, NIST Voluntary Product Standard PS 20.
- Exterior wall coverings, water-resistive barriers and flashing: International Residential Code, exterior wall covering provisions.
- Silica dust: OSHA 29 CFR 1926.1153.
- Lead paint: EPA Renovation, Repair and Painting rule, 40 CFR Part 745.
- Siding clearances, fasteners and paint intervals: manufacturer installation instructions for James Hardie, LP SmartSide and vinyl siding makers.
- History: Andrew Jackson Downing, Cottage Residences (1842).
- Paint coverage: the label of the paint you buy. The 350 sq ft per gallon used here is a common figure.
- Prices and lifespans: carried over from the earlier version with no named source.
- Calculations: every example in Sections 2 and 6 was recomputed and checked with (n * B) + ((n – 1) * gap) = W.
- Update cadence: review the price table quarterly and the rest of the page annually.
- Editorial standards: see the editorial policies and about IntelCalculator.
13. Conclusion
A good board and batten wall starts with three numbers: the actual batten width, a clearly defined gap and a layout that passes (n * B) + ((n – 1) * gap) = W. With those, style, material and budget become simple choices.
Your next steps:
- Pick a style from Section 3.1.
- Run your wall through the board and batten wall calculator in Section 5.1.
- Add a waste allowance.
- Check paint volume with the paint calculator.
For exterior work, start with the siding manufacturer instructions and your local code. Then plan the project with the siding calculator, and browse all construction calculators for the next step.