
Last updated: Oct 21, 2026
Grout Calculator
Method: grout volume per square metre equals (tile length + tile width) divided by (length x width), multiplied by joint width and joint depth. Weight equals volume times installed density. Cement grouts are commonly specified under ANSI A118.6 and A118.7, epoxy under A118.3, and installation practice follows ANSI A108.10 and the TCNA Handbook.
Field experience: most over-orders come from using full tile thickness as joint depth on thick porcelain. Most shortages come from uneven substrates, mixing loss and ignoring the first bag lost to tool and bucket residue. The waste and overage card models these separately.
Data: densities and pack sizes are typical manufacturer ranges. Prices are 2026 planning estimates in US dollars, so replace them with local quotes. Always read the product data sheet for coverage, mixing ratio and cure times.
Grout Calculator: How Much Grout Do You Need for Your Tile Job?
Published by Intel Calculator team. Last updated October 2026. Prices last checked October 2026 (Intel Calculator team planning estimates). See our editorial policies for how we build and review tools.
A grout calculator tells you how much grout to buy for a tile job. For 12 × 12 inch (300 × 300 mm) tile with a 1/8 inch (3 mm) joint, you need about 0.08 lb of grout per square foot, which is 0.39 kg per square meter, waste included. Buying too little grout stops a job halfway. Buying too much wastes money.
Our grout calculator tells you how much grout to buy before you start. Enter your area, tile size, joint width and grout type. You get grout weight, bag count, material cost, and a time and cure plan. It works for floors, walls, showers, backsplashes and patios.
It suits homeowners, DIY tilers, contractors and estimators. Grout is a small share of a tile budget, but running short is costly. Colors can shift between batches, and a second trip delays curing.
How Much Grout Per Square Foot or Meter?
Short answer: at a 3 mm joint, 10 mm depth, polymer-modified sanded grout and 10 percent waste, a 300 × 300 mm tile needs about 0.39 kg of grout per square meter (0.08 lb per square foot).
A 600 × 600 mm tile needs about 0.19 kg per square meter. A 48 × 48 mm mosaic needs about 2.41 kg per square meter. Use the grout calculator for your exact tile, joint and grout type.
- 12 × 12 in tile, 1/8 in joint: about 0.08 lb per ft² (0.39 kg per m²).
- 12 × 24 in tile, 1/8 in joint: about 0.06 lb per ft² (0.29 kg per m²).
- 24 × 24 in tile, 1/8 in joint: about 0.04 lb per ft² (0.19 kg per m²).
- 48 × 48 mm mosaic, 1/8 in joint: about 0.49 lb per ft² (2.41 kg per m²).
- One 10 lb bag: covers about 126 ft² of 12 × 12 in tile but only about 20 ft² of 48 × 48 mm mosaic.
In short, the grout per square foot depends mostly on tile size. The rest of this guide explains why, shows the formula, and links each step to the matching card in the calculator.
What Is Grout and What Does It Do?
Grout is a cement- or resin-based filler that sits in the joints between tiles. It does three jobs. It fills the gap so the surface is flat and finished. It keeps water and dirt out of the joint. It stabilizes the edges of neighboring tiles so they are less likely to chip.
Grout does not do two things people often assume. It is not an adhesive, so it does not hold tile down. It is not structural, so it does not add strength to the floor or wall. The tile bond comes from thinset, and building movement is handled by movement joints filled with flexible sealant.
Joints exist for two reasons. Tile is made to a size tolerance, so neighboring tiles are never identical. A floor also moves a little with temperature and load. A joint gives both variations somewhere to go, and the grout then closes that joint. Joint width therefore sets both the look of the job and the amount of grout you buy.
What a Grout Calculator Does
A grout calculator, also called a grout estimator, grout quantity calculator or grouting calculator, tells you how much tile grout to buy. It finds the empty space in your joints, then turns that volume into weight and bags.
It also answers the question “how much grout do I need?” in the units you buy it in. Our tool shows kilograms and pounds, rounds up to whole bags, and prices the purchase. It works as a tile grout calculator for rectangular tile and gives a safe estimate for special shapes (see the section on hexagon, penny round and herringbone tile).
The calculator is more than a single form. It has 12 connected estimators. Key results from one card auto-fill the next, and you can override any value.
Who Should Use It
- Homeowners: Plan a bathroom, kitchen or backsplash and avoid a second store run.
- Contractors: Quote jobs faster and compare grout types for clients. Add your margin with the markup and margin calculator.
- Designers and buyers: See how tile size and joint width change cost.
- Property managers: Plan repairs and keep a matching repair reserve.
How to Use the Grout Calculator
Start with the Basic Grout Calculator card. Follow these seven steps.
- Measure the area to grout. Use a square footage calculator or square meter calculator for odd shapes.
- Pick a tile size preset, or enter a custom length and width.
- Set joint depth. This is the true depth of grout in the joint, which is usually your tile thickness minus any thinset squeeze-up (see “Joint Depth, Explained” below).
- Choose a joint width from the list.
- Select your grout type.
- Choose a waste allowance and a bag size.
- Press Calculate.
Not sure where to begin? Press Fill Example to load a sample job. Press Reset to start over. A default result shows on page load, so you can see the output before you type.
Inputs Explained
| Input | What it means | Typical value |
| Area to grout | Total tiled surface. Enter m², ft² or yd². | Varies |
| Tile size preset | Fills length and width for you. 36 common sizes, from 20 × 20 mm mosaics to 1200 × 2400 mm slabs. | 300 × 300 mm |
| Tile length and width | Tile dimensions. Switch between mm, cm and in. | 300 × 600 mm |
| Joint depth | How deep grout sits in the joint. Tile thickness minus thinset squeeze-up. | 8–10 mm |
| Joint width | Gap between tiles. Also called the grout line, grout joint or tile gap. | 2–4 mm |
| Grout type | Cement, polymer-modified, epoxy, urethane, and more. Sets density and price. | Polymer-modified sanded |
| Waste allowance | Extra for spills, mixing loss and cleanup. | 10–15% |
| Bag or kit size | Pack size you will buy. | 4.5 kg (10 lb) |
The grout calculator asks for area, tile size, tile length and width, joint depth (usually 8 to 10 mm), joint width (usually 2 to 4 mm), grout type (polymer-modified sanded is typical), waste allowance (10 to 15 percent) and bag size (4.5 kg or 10 lb is typical). The gap between tiles is called the grout line, grout joint or tile gap. If you buy a different pack, such as a 10 kg (22 lb) kit, change the bag size field.
Need unit help? Use our mm to inches converter, cm to inches converter or area converter.
Results Explained
The calculator returns six results.
- Grout to buy: Installed weight plus waste.
- Bags needed: Rounded up to whole grout bags, with the spare shown.
- Joint volume: Empty joint space in liters.
- Consumption rate: Grout per square meter, or kg/m².
- Joint length: Running meters of grout line.
- Material cost: Purchased weight times a 2026 planning price per kg.
You also get a table and a chart. Hover any chart point for exact values. In plain terms, the tool gives you a weight, a bag count and a price for the grout you need to buy.
The 12 Connected Estimators
Each card works alone. Together they cover the full project. Select a card name to jump straight to it.
- Basic Grout Calculator: Weight, bags and cost.
- Joint Width Sensitivity Analysis: Cost from 0.5 to 20 mm joints.
- Tile Size and Joint Matrix: Heatmap of 90 combinations.
- Grout Type Comparison: Two types on cost, life and six performance scores.
- Project Cost Estimator: Adds sealer, tools, labor and tax.
- Multi-Zone Room Planner: Floor, walls, shower and backsplash together.
- Waste and Overage Analyzer: Splits waste, uneven substrate, spillage and mixing loss.
- Time and Cure Planner: Mixing, application and cure by crew and temperature.
- Lifetime Cost Comparison: Three types over 5 to 40 years.
- Tile Format Comparison: Six tile formats side by side.
- Real-World Scenario Explorer: 13 typical rooms.
- Purchase Plan and Reserve: Bag rounding plus a repair reserve.
The grout calculator sits in the tile and flooring installation materials group of construction calculators. These tools turn a layout into a shopping list: tile quantity, setting mortar, grout, sealant and cost, so every purchase is sized before the first tile is set. Browse the full set in our construction calculators hub.
The Grout Formula Explained
You do not need the math to use the tool. But knowing it helps you check any result, including ours.
The Core Formula
Grout volume per square meter depends on three things: tile size, joint width and joint depth.
Joint volume per m² (liters) = (L + W) ÷ (L × W) × joint width × joint depth
Here L and W are tile length and width in millimeters. Then:
Weight (kg) = Area × joint volume × grout density × (1 + waste %)
The calculator then divides by your bag size and rounds up. To check joint volume by hand, use our volume calculator.
Why the Formula Works
Each tile has joints on all four sides, but each joint is shared with a neighbor. So one tile “owns” half of its perimeter in joint length. That is why the formula uses (L + W) rather than 2 × (L + W).
Smaller tiles mean more joints per square meter. That is why mosaics use far more grout than large-format tiles.
Imperial Formula for US Readers
US users can enter feet, inches and pounds directly in the grout calculator. To check a result by hand in imperial units, use this plain-text formula. L, W, joint width and joint depth are in inches.
Grout weight in pounds = Area in ft² × 144 × (L + W) ÷ (L × W) × joint width × joint depth × density in lb per in³ × (1 + waste)
For polymer-modified sanded grout at 1.75 kg per liter, density is about 0.0632 lb per cubic inch.
Example: 100 ft² of 12 × 12 in tile, a 1/8 in (0.125) joint, 3/8 in (0.375) depth and 10 percent waste.
- 144 × (24 ÷ 144) × 0.125 × 0.375 = 1.125 cubic inches per ft².
- 100 × 1.125 = 112.5 cubic inches.
- 5 × 0.0632 = 7.11 lb.
- 11 × 1.1 = 7.82 lb.
The result is about 7.8 lb, which fits in one 10 lb bag. It agrees with the metric quick answer of 0.08 lb per ft² within rounding. To convert a rate yourself, multiply kg/m² by 0.2048 to get lb/ft². Our pounds to kilograms converter and inches to fraction converter help with the rest.
Assumptions and Limitations
Every estimate has limits. Know ours.
- Joints are assumed to be a straight, full-depth rectangle.
- Densities are typical manufacturer ranges, not your exact product.
- Prices are 2026 planning estimates in US dollars, set by the Intel Calculator team. Replace them with local quotes.
- The tool cannot see your substrate. Uneven floors need extra grout.
- The rectangular tile formula is approximate for hexagon, penny round, herringbone and pebble layouts.
- Always check the product data sheet for coverage, mixing ratio and cure times.
How Much Grout You Need by Tile Size
Smaller tiles need much more grout. Use the flooring calculator to find how many tiles to buy, then use this table for the grout. It uses our calculator’s formula for a 3 mm joint, 10 mm depth, polymer-modified sanded grout (1.75 kg/L) and 10% waste.
| Tile size | Joint length (m per m²) | Rate (kg/m²) | Rate (lb/ft²) |
| 48 × 48 mm mosaic | 41.7 | 2.41 | 0.49 |
| 100 × 100 mm | 20.0 | 1.16 | 0.24 |
| 150 × 150 mm | 13.3 | 0.77 | 0.16 |
| 300 × 300 mm (12 × 12 in) | 6.7 | 0.39 | 0.08 |
| 300 × 600 mm (12 × 24 in) | 5.0 | 0.29 | 0.06 |
| 600 × 600 mm (24 × 24 in) | 3.3 | 0.19 | 0.04 |
| 1200 × 1200 mm | 1.7 | 0.10 | 0.02 |
At a 3 mm joint and 10 mm depth, a 300 × 300 mm tile needs about 0.39 kg per square meter (0.08 lb per square foot), a 600 × 600 mm tile about 0.19 kg and a 48 × 48 mm mosaic about 2.41 kg.
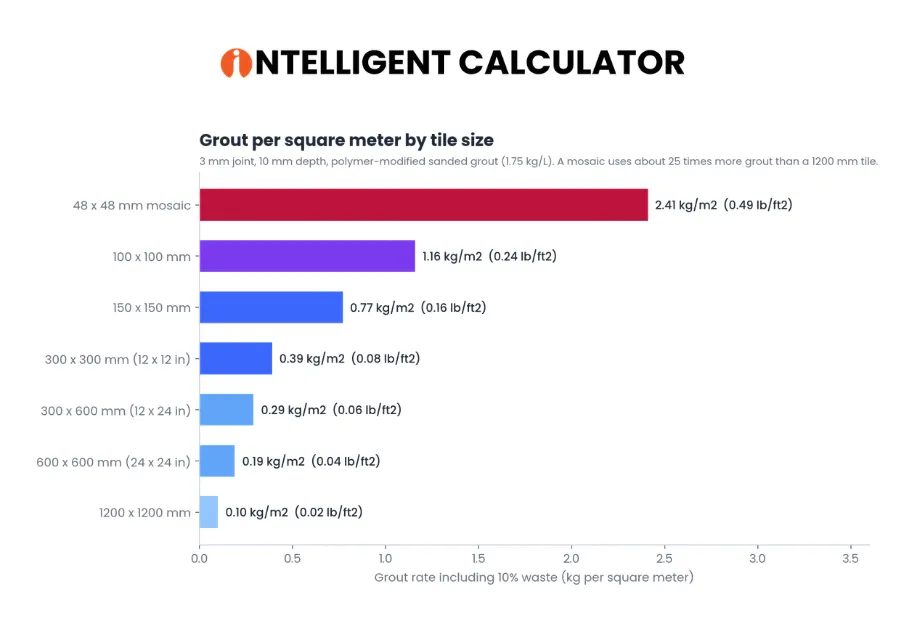
Figure 1. Grout per square meter by tile size (3 mm joint, 10 mm depth, polymer-modified sanded grout, 10% waste).
Our analysis of this data shows a clear pattern. Doubling the tile size roughly halves grout use. A mosaic uses about 25 times more grout per square meter than a 1200 mm tile.
This is a real budget lever. Large formats cut grout, labor and joint count. They do demand flatter substrates and stronger setting beds. The Tile Format Comparison card puts six formats side by side.
How Much Grout for 100, 500 and 1,000 Square Feet?
The grout needed for 100, 500 or 1,000 square feet scales in a straight line with area. The table uses a 1/8 in (3 mm) joint, 10 mm depth, polymer-modified sanded grout and 10% waste.
| Tile | Area | Grout (lb) | Grout (kg) | 10 lb bags | 25 lb bags |
| 12 × 12 in | 100 ft² | 7.9 | 3.6 | 1 | 1 |
| 12 × 12 in | 500 ft² | 39.4 | 17.9 | 4 | 2 |
| 12 × 12 in | 1,000 ft² | 78.8 | 35.7 | 8 | 4 |
| 12 × 24 in | 100 ft² | 5.9 | 2.7 | 1 | 1 |
| 12 × 24 in | 500 ft² | 29.6 | 13.4 | 3 | 2 |
| 12 × 24 in | 1,000 ft² | 59.1 | 26.8 | 6 | 3 |
| 48 × 48 mm mosaic | 100 ft² | 49.3 | 22.4 | 5 | 2 |
| 48 × 48 mm mosaic | 500 ft² | 246.4 | 111.8 | 25 | 10 |
| 48 × 48 mm mosaic | 1,000 ft² | 492.8 | 223.5 | 50 | 20 |
For 100 square feet of 12 × 12 inch tile you need about 7.9 lb, which is one 10 lb bag. For 1,000 square feet of the same tile you need about 79 lb. Mosaic needs about eight times more at the same area.
Grout Coverage per Bag (10 lb and 25 lb)
A 4.5 kg (10 lb) bag of polymer-modified sanded grout covers about 126 square feet of 12 × 12 inch tile at a 3 mm joint, but only about 20 square feet of 48 × 48 mm mosaic. The table below gives a grout coverage chart by tile size. It assumes a 3 mm joint, 10 mm depth, 1.75 kg per liter and 10 percent waste.
| Tile size | Per 4.5 kg (10 lb) bag | Per 11.34 kg (25 lb) bag |
| 48 × 48 mm mosaic | 1.9 m² (20 ft²) | 4.7 m² (51 ft²) |
| 100 × 100 mm | 3.9 m² (42 ft²) | 9.8 m² (106 ft²) |
| 300 × 300 mm (12 × 12 in) | 11.7 m² (126 ft²) | 29.5 m² (317 ft²) |
| 300 × 600 mm (12 × 24 in) | 15.6 m² (168 ft²) | 39.3 m² (423 ft²) |
| 600 × 600 mm (24 × 24 in) | 23.4 m² (252 ft²) | 58.9 m² (634 ft²) |
| 1200 × 1200 mm | 46.8 m² (503 ft²) | 117.8 m² (1,268 ft²) |
To adjust for your own job, double the joint width and the coverage halves. Real products differ in density and mixing yield, so compare these figures with the manufacturer coverage chart (see “Check Your Result Against the Bag Label”).
How Joint Width and Depth Change Grout Use
Grout weight rises in a straight line with joint width. Double the joint and you double the grout.
Here is a 20 m² floor (about 215 ft²) with 300 × 600 mm tiles, 9 mm depth, polymer-modified sanded grout and 10% waste:
| Joint width | Grout needed | Material cost (at $3.20/kg) |
| 2 mm | 3.5 kg | $11.10 |
| 3 mm | 5.2 kg | $16.60 |
| 4 mm | 6.9 kg | $22.20 |
| 6 mm | 10.4 kg | $33.30 |
Each extra millimeter adds about 1.7 kg here. Use the Joint Width Sensitivity card to see this for your own job, and the Tile Size and Joint Matrix to compare 90 size and joint combinations.
Do Not Over-Narrow Your Joints
Tighter joints save grout, but tile tolerance matters. Rectified tiles allow joints of roughly 1.5 to 3 mm. Non-rectified (calibrated) tiles vary in size and need wider joints to hide the differences. The tile product standard ANSI A137.1 defines rectified and calibrated tile.
Follow the tile maker’s minimum joint width. Cramming tiles too close can lead to cracking and lippage. Wider joints are not a free fix for an uneven floor either: a flat substrate and a correct layout matter more than joint width.
Joint Depth, Explained
Joint depth is the true depth of grout in the joint. It equals tile thickness minus any thinset that has squeezed up into the joint. Figure 2 shows the cross-section: substrate at the bottom, a thinset bed, two tiles, and the joint between them. If thinset rises into the joint, the grout sits on top of it and the true depth is smaller than the tile thickness.
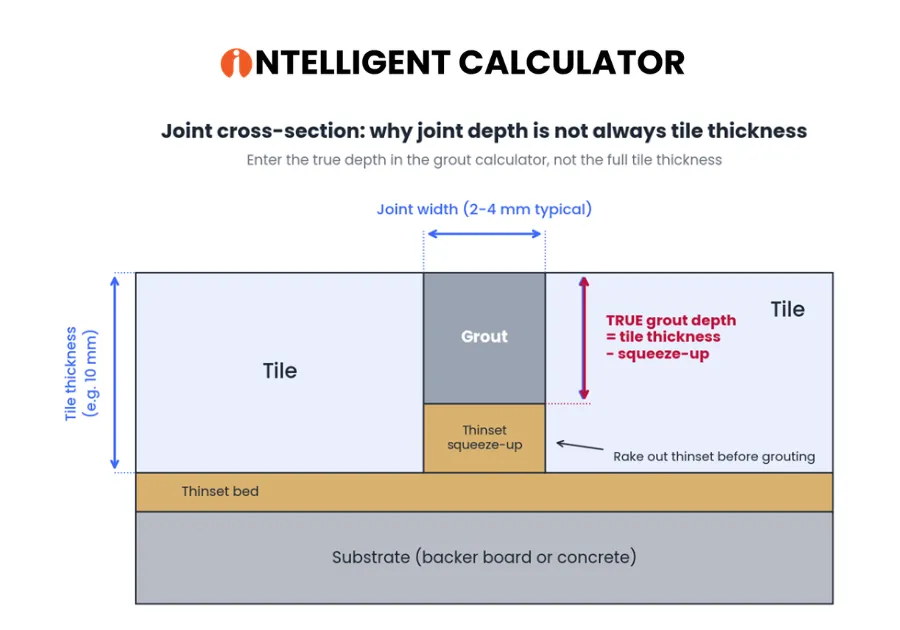
Figure 2. Joint cross-section: true grout depth = tile thickness minus thinset squeeze-up.
This resolves a common confusion. The how-to steps say joint depth is usually your tile thickness, and that holds when the joint is clean and fully open. Many people enter full tile thickness on thick porcelain even when thinset or a deep bevel reduces the open space. That overstates grout use.
- Rake the joints. Remove thinset squeeze-up before grouting, then measure the open depth with a ruler or the tip of a thin tool.
- Bevels and textured edges. If the joint is not fully open to the tile’s full depth, a lower depth may be correct. Confirm with the product data sheet before reducing it.
- When unsure. Use tile thickness for a safe maximum, then compare against the reduced depth and buy between the two.
How Much Does an Error Change the Bag Count?
Grout weight is linear in depth and in width, so errors scale in the same ratio. For the 20 m² floor of 300 × 600 mm tile above (3 mm joint, polymer-modified sanded grout, 10 percent waste), a true depth of 9 mm gives 5.2 kg. Entering 12 mm instead of 9 mm raises the estimate to about 6.9 kg, one third too high (12 ÷ 9 = 1.33). A 20 percent depth error adds about 1 kg. A 1 mm width error adds about 1.7 kg.
Types of Grout Compared
Grout type changes density, price, stain resistance and lifespan. The calculator includes 12 types.
| Grout type | Density (kg/L) | Est. price ($/kg) | Typical life | Best for |
| Sanded cement | 1.80 | 2.40 | 10 years | Dry floors, wide joints |
| Unsanded cement | 1.70 | 2.80 | 8 years | Narrow joints, soft stone |
| Polymer-modified sanded | 1.75 | 3.20 | 15 years | General floors |
| Epoxy 100% solids | 1.70 | 11.00 | 25 years | Showers, commercial kitchens |
| Epoxy-modified cement | 1.75 | 6.00 | 18 years | Showers, wet areas |
| Urethane premixed | 1.45 | 9.00 | 20 years | Stain-prone areas |
| Premixed acrylic | 1.55 | 5.00 | 12 years | Quick small repairs |
| Rapid-set cement | 1.80 | 4.00 | 12 years | Fast turnaround |
Sanded cement costs about $2.40 per kg and lasts about 10 years in the model, polymer-modified sanded about $3.20 per kg and 15 years, and epoxy 100% solids about $11.00 per kg and 25 years. Prices are Intel Calculator planning estimates, last checked October 2026. Typical lives are model assumptions, not guarantees.
The tool also covers polymer-modified unsanded, wide-joint cement, stone and marble grout, and furan resin. Furan resin is a chemical-resistant resin grout used mainly on industrial floors. Urethane is a flexible, premixed grout that resists stains without sealing. Use the Grout Type Comparison card to compare any two types on cost, life and six performance scores.
Sanded vs. Unsanded Grout
Sanded grout contains fine sand. It resists shrinkage in wider joints. Unsanded grout is smoother and suits narrow joints and soft surfaces that scratch easily. Unsanded grout is also sold as non-sanded or sandless grout.
A common guide is unsanded for joints up to about 3 mm (1/8 in) and sanded for wider ones. Do not use unsanded grout in wide joints, because it shrinks and cracks. Always follow your grout maker’s range. If you are searching for a sanded grout calculator, the tool covers both: pick the type, and the density and price update.
Epoxy vs. Cement Grout
Epoxy resists stains and water without sealing. It costs several times more and sets quickly, so it is harder to apply. Cement grout is cheaper and easier to clean up, but needs sealing. For cement-based mortar and screed around the job, use our cement calculator.
ANSI stands for the American National Standards Institute. Cement grouts are commonly specified under ANSI A118.6 (standard cement grouts) and ANSI A118.7 (polymer-modified cement grouts). Epoxy falls under ANSI A118.3. Installation practice follows ANSI A108.10 and the TCNA Handbook from the Tile Council of North America.
If you want an epoxy grout calculator, pick “Epoxy 100% solids” in the Basic Grout Calculator and read the cost and cure results. The price per kg is much higher, so the bag count matters.
Grout vs Thinset vs Caulk: What Goes Where
Grout, thinset and caulk are three different products. Grout is not thinset and it is not caulk.
- Thinset is the mortar that bonds tile to the surface. It goes under the tile.
- Grout fills the joints between tiles. It goes between tiles.
- Caulk is a flexible sealant used at movement joints, such as corners, perimeters and changes of plane. It replaces grout there.
- Grout sealer is a separate product applied to cement grout to resist stains. Grout fills the joint; sealer protects it.
Mixing these up causes the most common failures. Filling a movement joint with rigid grout leads to cracks, because the joint cannot flex.
Movement Joints and Caulk
A movement joint is a flexible, sealant-filled joint that allows small building movement. It is not filled with grout. Use caulk where tile meets a wall, a tub, a different material or an inside corner, and where the layout continues over a joint in the substrate. Match the sealant color to the grout.
Caulk joints change the grout count. Measure the length of each movement joint, then subtract it from your grout joint length. Use the linear foot calculator for the running length. A perimeter caulk joint also means you should not order grout for it. Forgetting this is a common reason people over-order.
Worked Examples
These examples use the calculator’s own formulas and 2026 planning prices.
Example 1: Bathroom Floor
- Area: 8 m² (about 86 ft²)
- Tile: 300 × 600 mm, 9 mm thick
- Joint: 3 mm
- Grout: Polymer-modified sanded (1.75 kg/L, $3.20/kg)
- Waste: 10%
Step 1. Joint volume per m² = (900 ÷ 180,000) × 3 × 9 = 0.135 L.
Step 2. Total volume = 8 × 0.135 = 1.08 L.
Step 3. Weight = 1.08 × 1.75 = 1.89 kg.
Step 4. With 10% waste = 2.08 kg.
You need about 2.1 kg. A 2.27 kg (5 lb) bag covers it, with a small spare. Material cost is about $7.30. This answers “how many bags of grout for a bathroom floor”: one small bag.
Example 2: Shower Walls and Floor
- Area: 9 m² (about 97 ft²)
- Tile: 100 × 300 mm, 8 mm thick
- Joint: 2 mm
- Grout: Epoxy-modified cement ($6.00/kg)
- Waste: 10%
Joint volume per m² = (400 ÷ 30,000) × 2 × 8 = 0.213 L. Total volume is 1.92 L. Weight is 3.36 kg, or 3.70 kg with waste.
One 4.5 kg bag covers it. Material cost is about $27. Small tiles in a shower give a high rate of 0.41 kg/m², so do not guess here.
Example 3: Entry Mosaic
- Area: 6 m² (about 65 ft²)
- Tile: 48 × 48 mm, 6 mm thick
- Joint: 3 mm
- Grout: Epoxy 100% solids ($11.00/kg)
- Waste: 10%
Joint volume per m² = (96 ÷ 2,304) × 3 × 6 = 0.75 L. Total volume is 4.5 L. Weight is 7.65 kg, or 8.42 kg with waste.
A 10 kg kit is the right buy. Material cost is $110. That is a lot for 6 m², which shows why mosaic and epoxy together need careful planning.
Example 4: Rounding Matters
A 100 ft² (9.29 m²) floor with 300 × 600 mm tile, 3 mm joints, 9 mm depth and 10% waste needs 2.41 kg. That is just over one 2.27 kg bag, so you must buy two. Whole-bag rounding is why the calculator shows the spare.
Hexagon, Penny Round and Herringbone Tile: How Much Grout?
The rectangular formula is exact for straight-lay rectangles and a good estimate for other shapes. Figure 3 shows how three common layouts change the joint.
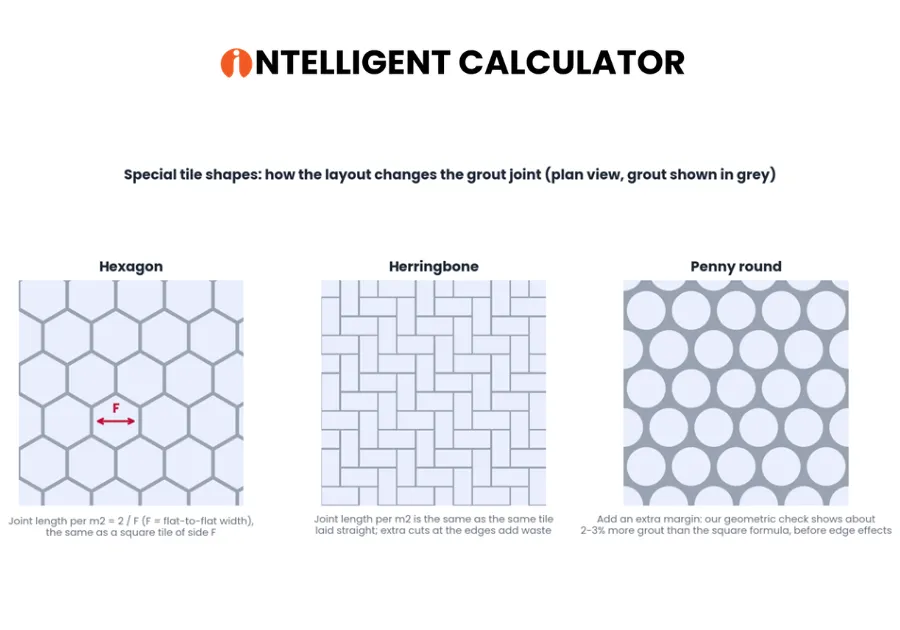
Figure 3. Hexagon, herringbone and penny round layouts, plan view (grout in grey).
- Hexagon tile grout calculation: a regular hexagon with flat-to-flat width F has the same joint length per square meter as a square tile of side F, which is 2 ÷ F. Enter F as both the length and the width.
- Herringbone: every tile still shares all four sides, so joint length per square meter equals the same tile laid straight. Use the plain length and width. Extra edge cuts mean more waste, so use the upper end of the waste range.
- Penny round and pebble: our geometric check for staggered penny rounds shows about 2 to 3 percent more grout than the square formula, before edge effects. Add a margin, and use the manufacturer chart for mosaic sheets and irregular pebble.
These are approximations. The tool cannot see rounded edges, mesh gaps or irregular stones, so confirm with the product coverage chart.
Check Your Result Against the Bag Label
The calculator and the bag label can give different numbers because each assumes different inputs. A bag label coverage claim assumes one tile size, joint width and joint depth. It is not a universal number.
- Find the manufacturer coverage chart or data sheet for your product.
- Match your tile size, joint width and depth to a row in the chart.
- Compare the chart coverage with the calculator’s square feet per bag for the same inputs.
- If they differ by more than about 10 percent, check your depth first, then the density and mixing ratio.
- Buy to the higher number, and keep a repair reserve.
Trust the data sheet for a specific product, because it reflects that product’s density and yield. Trust the calculator for planning and comparison across products. Photograph the bag label and batch code before you open the first bag.
Waste, Overage and Repair Reserve
Grout is never used at the theoretical weight. The Waste and Overage Analyzer breaks the extra into four parts. Use our percentage calculator to convert any waste percentage to a weight.
- Waste: Typical 10–15%.
- Uneven substrate: Dips need more grout. Default 3%.
- Spillage: Default 2%.
- Mixing loss: Residue left on tools and in the bucket. Default 1%.
Our guidance is simple. A total overage of 10 to 20 percent is normal. Above 25 percent often signals poor substrate flatness or inexperience. These are Intel Calculator team guidelines, not a published standard. This also answers how much extra grout to buy: round up, then add a reserve.
Buy a Repair Reserve
Keep a sealed bag from the same batch. Colors vary slightly between production lots, so a later purchase may not match. The Purchase Plan and Reserve card adds a reserve and shows how much of your purchase ends up in the joints.
Buy all grout for connected areas at once. This keeps color consistent across a continuous floor. Write the batch code on the bag and keep leftover grout sealed and dry.
What Grouting Really Costs
Material cost is only part of the picture. The Project Cost Estimator adds sealer, tools, labor and sales tax. It uses labor hours equal to area divided by grouting speed. Add local tax with the sales tax calculator.
Professional crews grout about 2 to 4 m² per hour on standard tile. This speed is an Intel Calculator team planning estimate, not a measured industry figure. Mosaics and epoxy are slower. Lower the speed input for those jobs.
Lifetime Cost: Cheap Grout Can Cost More
The Lifetime Cost card adds sealing and re-grouting over time. We ran the 9 m² shower from Example 2 over 25 years. We used the tool’s default sealer cost of $1.50 per m² per coat and $22 per m² re-grout labor.
| Grout type | Initial material | Sealings | Re-grouts | 25-year total |
| Sanded cement | $9 | 25 | 2 | about $761 |
| Polymer-modified sanded | $12 | 12 | 1 | about $384 |
| Epoxy 100% solids | $39 | 0 | 0 | about $39 |
Over 25 years in the 9 square meter shower example, sanded cement totals about $761, polymer-modified sanded about $384 and epoxy 100% solids about $39 in this model.
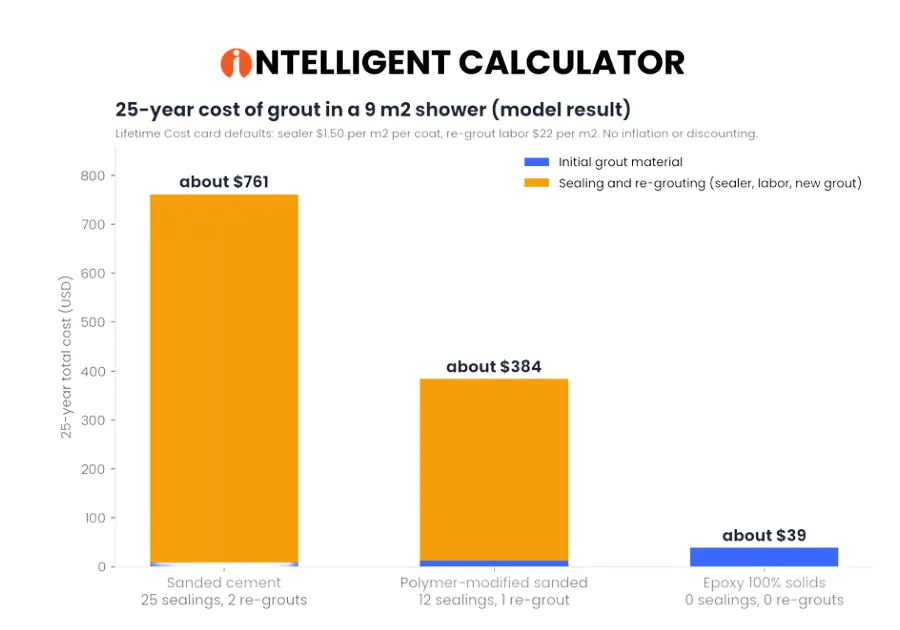
Figure 4. 25-year cost by grout type in a 9 m² shower (model result).
The lowest sticker price carries the highest lifetime cost in this model. Sealing and labor, not the grout itself, drive the gap.
Read this with caution. The model assumes annual sealing for sanded cement, no resealing for epoxy, and fixed life spans. It ignores inflation and discounting. Real homes often skip sealing, and epoxy needs skilled installation. Treat the table as a comparison tool, not a promise.
Time, Temperature and Cure
The Time and Cure Planner estimates five phases: mixing, applying, open wait, cleanup and haze wipe. Then it adds foot-traffic and full-cure times. Open time is the wait between applying grout and starting cleanup.
Temperature matters. The tool scales cure time by 2^((20 − T) ÷ 10) from a 20 °C (68 °F) baseline, limited to between 0.5 and 3 times.
| Grout type | Foot traffic at 20 °C | Full cure at 20 °C | Full cure at 10 °C |
| Standard cement | 24 hours | 7 days | about 14 days |
| Rapid-set cement | 3 hours | 1 day | about 2 days |
| Epoxy 100% solids | 24 hours | 5 days | about 10 days |
| Urethane premixed | 12 hours | 3 days | about 6 days |
At 20 °C (68 °F), standard cement grout allows foot traffic after 24 hours and fully cures in 7 days, rapid-set cement after 3 hours and 1 day, 100% solids epoxy after 24 hours and 5 days, and premixed urethane after 12 hours and 3 days. At 10 °C (50 °F) full cure takes about twice as long.
Cold rooms slow curing, and frost can damage cement grout. Most data sheets set a minimum application temperature, commonly around 50 °F (10 °C) , so check yours. Need to convert temperatures? Use our Fahrenheit to Celsius converter.
Pot Life and Working Time
Pot life is the time a mixed grout stays workable before it starts to set. It is shortest for epoxy and rapid-set products. Mix only the amount your crew can place before pot life ends, and use a smaller batch if the room is warm.
Water-to-Powder Ratio and Why It Changes Yield
Mix by the manufacturer water ratio, not by eye. Extra water thins the paste, can change color and weakens the cured grout. The mixing ratio also changes the yield of a bag, because the volume of paste you get per pound of powder depends on the water added. The calculator uses typical densities, so check the mixing ratio and yield on your data sheet.
How to Seal Cement Grout and How Often
Cement grout needs sealing; epoxy and urethane usually do not. Wait until the grout has fully cured, then apply a penetrating sealer to the grout lines following the product data sheet. Do not seal cement grout before it has fully cured. A penetrating sealer soaks into the grout, while a topical sealer forms a film on top. The model in this guide assumes annual sealing for sanded cement, which is a planning assumption, not a rule.
Special Cases and Safety
Which Grout for Which Room?
- Bathroom floor: polymer-modified sanded grout is the general choice.
- Shower: epoxy or epoxy-modified cement for stain and water resistance.
- Kitchen backsplash: unsanded or polymer-modified grout for narrow joints and easy cleaning.
- Patio or pool surround: wide-joint cement or polymer-modified grout for frost and moisture.
- Commercial kitchen: epoxy 100% solids or furan resin, per the product rating.
The Real-World Scenario Explorer runs 13 typical rooms with these specifications.
Rectified and Large-Format Tile
Rectified tile has precisely cut edges. It allows narrow joints, which cut grout use. Large format also demands a flat substrate and a proper setting bed. As a guide, TCNA and ANSI A108.02 limits are about 1/4 inch in 10 feet for most tile and about 1/8 inch in 10 feet for large-format tile. The tool cannot see flatness, so uneven floors need a margin.
Natural Stone and Marble
Stone can scratch and stain. The calculator includes a stone and marble grout type. Use unsanded or stone-rated grout, and seal the stone as the maker advises. Avoid sanded grout on polished marble that scratches.
Outdoor Patios and Pool Surrounds
Outdoor joints are often wider, up to 10 mm in the calculator’s scenarios. They face frost and moisture. Wide-joint cement and polymer options are typical. For pavers set in sand, try our paver calculator instead; use the grout calculator where tile, not pavers, is the topic.
Showers and Wet Areas
Showers need stain and water resistance. The scenario explorer suggests epoxy for showers and commercial kitchens. Check your product’s wet-area rating. Use the Multi-Zone Room Planner to add the shower floor, walls and niche in one plan.
Health and Safety Warnings
- Silica dust: Powdered cement and sanded grouts can release fine dust. Wear a suitable respirator when mixing, and follow the safety data sheet. In the US, construction silica exposure is covered by OSHA 29 CFR 1926.1153.
- Epoxy and urethane: Ventilate the room and wear gloves. Avoid skin contact and follow the maker’s instructions.
- Cold weather: Do not grout in freezing conditions unless the product allows it.
Failure Modes and Fixes
Five problems show up most often after grouting. Each has a cause and a fix.
- Cracking: caused by movement, too-narrow joints or filling movement joints with grout. Fix with correct joint width and caulk at movement joints.
- Pinholing: small holes caused by trapped air or too little compaction. Pack the joint firmly and avoid over-wet mixing.
- Efflorescence: a white powdery deposit left when water carries salts to the grout surface. Fix the moisture source, then clean.
- Haze: a thin grout film left on tile after cleaning. Wipe at the right time and use the cleaner the maker names.
- Color blotching: uneven color from different water amounts or batches. Mix by ratio and use one batch.
Common Mistakes and Pro Tips
Common Mistakes
- Using full tile thickness as joint depth on thick porcelain.
- Leaving thinset in the joints and then entering full tile thickness as depth.
- Forgetting the first bag lost to tools and bucket residue.
- Ignoring an uneven substrate.
- Mixing more than the crew can place before the pot life ends.
- Buying grout in two batches and getting a color mismatch.
- Mixing up mm and inches. Joints are tiny, so a unit error hurts.
- Filling movement joints with grout instead of flexible sealant, or forgetting the perimeter caulk joint and over-ordering grout for it.
- Buying grout before the tile is chosen, then finding the joint minimum is different.
- Using sanded grout on polished marble that scratches.
Pro Tips
- Mix small batches. Fresh grout is easier to work and clean.
- Test a spare tile first. Check the color and cleanup before committing.
- Round up, then add a reserve. One extra bag beats a second trip.
- Check flatness. Large tiles on bumpy floors waste grout and look poor.
- Re-run the numbers. Change one input at a time to see its effect.
- Photograph the bag label and batch code before you open the first bag.
- Rake thinset out of the joints before grouting so the true depth is known.
- Mix by the manufacturer water ratio, not by eye.
- Compare the calculator result with the label coverage chart before you buy.
Key Terms
See the full construction and tile glossary for more definitions.
- Grout: A cement- or resin-based filler for tile joints.
- Grout line (joint): The gap between tiles, also called the tile gap.
- Sanded grout: Grout with fine sand for wider joints.
- Unsanded grout: Smooth grout for narrow joints, also sold as non-sanded or sandless grout.
- Epoxy grout: A two-part resin grout with high stain resistance.
- Rectified tile: Tile cut after firing for exact edges.
- Calibrated tile: Tile sorted to a size range but not cut after firing, unlike rectified tile.
- Lippage: Uneven height between neighboring tiles.
- Haze: A thin grout film left on tile after cleaning.
- Thinset: The mortar that bonds tile to the substrate.
- Caulk: A flexible sealant used at movement joints.
- Movement joint: A flexible, sealant-filled joint that allows small building movement. It is not filled with grout.
- Grout sealer: A separate product applied to cement grout to resist stains.
- Pot life: The time a mixed grout stays workable before it starts to set.
- Open time: The wait between applying grout and starting cleanup.
- Efflorescence: A white powdery deposit left when water carries salts to the grout surface.
- Substrate: The surface under the tile, such as backer board or concrete.
- TCNA: The Tile Council of North America, which publishes the TCNA Handbook.
Related Calculators
Tile and flooring materials calculators turn a layout into a shopping list: tile quantity, setting mortar, grout, sealant and cost, so every purchase is sized before the first tile is set. Plan the rest of your project with these tools.
- Flooring calculator for total tile quantity.
- Square yards calculator for area in yd².
- Linear foot calculator for joint and trim lengths.
- Percentage calculator for waste percentages.
- Volume calculator to check joint volume by hand.
- Cement calculator and sand calculator for mortar and screed.
- Paint calculator if your remodel includes walls.
- All construction calculators for the full set.
Grout Calculator FAQs
How much grout do I need per square foot?
It depends on tile size, joint width and depth. For 12 × 12 inch tile with a 1/8 inch joint, expect roughly 0.08 lb per square foot including waste. A mosaic can need about 0.5 lb per square foot. Use the grout calculator for your exact numbers.
How do I calculate how much grout I need for tile?
Find the joint volume per square meter using (L + W) ÷ (L × W) × joint width × joint depth. Multiply by your area and by the grout’s density. Add 10 to 15 percent for waste. The grout calculator does all of this and rounds up to whole bags.
How many bags of grout do I need?
Divide your total grout weight by your bag size and round up. A job needing 2.4 kg takes two 2.27 kg bags. The grout calculator shows bags needed and the leftover amount.
Does tile size affect how much grout I need?
Yes, strongly. Smaller tiles have more joints per square meter. A 100 mm tile uses about three times more grout than a 300 mm tile at the same joint width.
What joint width should I use?
Use what your tile and layout require. Rectified tiles often allow 1.5 to 3 mm. Non-rectified and natural stone tiles usually need wider joints. Never go below the tile maker’s minimum.
Should I use sanded or unsanded grout?
Use unsanded for narrow joints, around 3 mm (1/8 inch) or less, and for soft surfaces. Use sanded for wider joints. Check your grout label for its joint range.
How much waste should I add?
Ten to fifteen percent is common. Rough substrates, small tiles and inexperienced installers may need more. If your total overage passes 25 percent, check your surface flatness and method.
Is epoxy grout worth the extra cost?
Often yes in showers and commercial kitchens. It resists stains and needs no sealing. In the grout calculator’s 25-year lifetime cost model for a 9 square meter shower, epoxy 100% solids had the lowest total cost. It is harder to install, so skill matters.
How long should grout cure before use?
Standard cement grout allows light foot traffic after about 24 hours and fully cures in about 7 days at 20 °C (68 °F). Rapid-set products are faster. Cold rooms slow curing, so follow your product’s data sheet.
How accurate is the grout calculator?
It is accurate for planning when your inputs are correct. It cannot see substrate flatness or product-specific density. Use the waste allowance, buy a repair reserve and check your product’s coverage chart.
Can I use the grout calculator for a shower, backsplash or patio?
Yes. Use the Multi-Zone Room Planner in the grout calculator for combined areas, and the Real-World Scenario Explorer for typical rooms. For outdoor work, choose a wider joint and a suitable grout type.
What if my tile size is not in the grout calculator’s list?
Pick “Custom size” in the grout calculator and enter the exact length and width. The calculator accepts millimeters, centimeters and inches.
How much grout do I need for 100 square feet of tile?
For 12 × 12 inch tile with a 1/8 inch joint, about 7.9 lb, which is one 10 lb bag. For 12 × 24 inch tile, about 5.9 lb. For 48 × 48 mm mosaic, about 49 lb. These include 10 percent waste.
How much does a 10 lb bag of grout cover?
At a 3 mm joint and 10 mm depth, a 10 lb (4.5 kg) bag covers about 126 square feet of 12 × 12 inch tile, 168 square feet of 12 × 24 inch tile and 252 square feet of 24 × 24 inch tile. It covers only about 20 square feet of 48 × 48 mm mosaic.
How much grout do I need for a shower?
In Example 2, a 9 square meter (97 square foot) shower of 100 × 300 mm tile with a 2 mm joint needs about 3.7 kg of epoxy-modified cement grout with waste, which is one 4.5 kg bag. Mosaic shower floors need far more, about 0.49 lb per square foot.
How much grout do I need for 12 × 24 inch tile?
About 0.06 lb per square foot at a 1/8 inch joint and 10 mm depth, including 10 percent waste. A 100 square foot floor needs about 5.9 lb.
How many pounds of grout do I need for 1,000 square feet?
About 79 lb for 12 × 12 inch tile, about 59 lb for 12 × 24 inch tile and about 493 lb for 48 × 48 mm mosaic, at a 1/8 inch joint and 10 mm depth with 10 percent waste.
Do I need to seal grout?
Cement grout needs sealing after it has fully cured, following the product data sheet. Epoxy and urethane grouts usually do not need sealing. Sealer is a separate product from grout.
What is the difference between grout and thinset?
Thinset is the mortar that bonds tile to the surface and goes under the tile. Grout fills the joints between tiles. Caulk, a third product, fills movement joints.
Can I use sanded grout in a 1/8 inch joint?
Often yes, but check the grout label. A common guide is unsanded for joints up to about 1/8 inch and sanded for wider joints, so 1/8 inch is where the two overlap. Avoid sanded grout on soft or polished surfaces that scratch, such as polished marble.
How do I match grout color if I run out?
Colors vary slightly between production lots, so a later bag may not match. Keep a sealed reserve bag from the same batch, and photograph the label and batch code. If you must buy more, bring a sample to compare, and test it on a spare tile.
What happens if I buy too little grout?
The job stops halfway and a second purchase may come from a different batch, which can give a color mismatch. Mixing a small extra batch also delays curing. Round up to whole bags and add a repair reserve.
Conclusion
A grout calculator turns tile size, joint width and depth into a clear buying plan. Smaller tiles and wider joints raise grout use fast. Grout type changes cost and lifespan far more than most people expect.
Use the tile grout calculator to find your weight, round to whole bags and add a repair reserve. Then check the time and cure plan before you start. A few minutes with a grout estimator saves a second trip and a color mismatch. Need a tool we do not have yet? Request a custom calculator.
Methodology, Sources and Review Log
- Formula: derived from joint geometry. Joint volume per square meter equals joint length per square meter multiplied by joint width and joint depth. All table and example values were recomputed from this formula and match the calculator within normal rounding.
- Densities: typical manufacturer ranges, not a specific product.
- Prices: Intel Calculator team planning estimates in US dollars, last checked October 2026. They are not quotes.
- Overage norms, crew speed and grout lifespans: Intel Calculator team estimates and model assumptions, not published standards.
- Standards named: ANSI A118.6, A118.7, A118.3, A108.10, ANSI A137.1, ANSI A108.02 and the TCNA Handbook.
- Regulation named: OSHA 29 CFR 1926.1153.
- Reviewer and date: technically reviewed by. Last review October 2026. Changes in this review: added quick answer, coverage per bag, imperial formula, joint depth explanation, movement joints and caulk, special shapes, bag-label cross-check, failure modes and ten new FAQs.
- Review schedule: prices every quarter, standards every year.
Disclaimer. This calculator gives planning estimates only. Real grout use depends on your tile, substrate, product and installer. Check the manufacturer data sheet and the TCNA Handbook, and ask a qualified tile installer to confirm quantities on large or high-risk jobs.