
Last updated: Oct 21, 2026
Tile Calculator

Enter room size, tile size, joint width and waste to get tiles, boxes, grout, adhesive, cost and a work timeline. Twelve independent cards share suggestions: results from one card pre-fill the next, and you can override anything.
Measure the surface, pick the tile size and joint, choose a layout for the waste allowance, then press Calculate. Each card works alone, and values from earlier cards appear with a blue Auto-filled mark.
Tiles needed = Area / ((tile length + joint) x (tile width + joint)), rounded up. Tiles to order = ROUNDUP(tiles needed x (1 + waste %)). Boxes = ROUNDUP(tiles to order / tiles per box). Grout (litres per m2) = (L + W) x joint x thickness / (L x W), all in mm.
120 sq ft, 12 x 12 inch tiles, 1/8 inch joint. Each tile plus joint covers 12.125 x 12.125 / 144 = 1.021 sq ft. 120 / 1.021 = 117.5, so 118 tiles. With 10% waste, 118 x 1.10 = 129.8, so order 130 tiles.
3.2 m wide, 2.4 m tiled height, one 1.2 x 1.0 m window. Gross 7.68 m2 minus 1.2 m2 window = 6.48 m2 net. Use Card 8 for this with doors and cut-outs.
Forgetting the joint in the tile size, not rounding up to whole boxes, using one waste figure for every layout, and mixing batches. Buy all tiles from the same batch and keep a few unopened spares.
How many extra tiles should I buy? Commonly 10% for straight layouts and 15% or more for diagonal or herringbone. Waste figures here are adjustable assumptions, so confirm with your tile maker or installer.
How many 12x12 tiles do I need for 120 square feet? About 118 net, or 130 with 10% waste and a 1/8 inch joint.
Do I include grout lines in the calculation? Yes. Each tile occupies its size plus one joint.
How do I calculate tiles for a wall with a window? Subtract the opening from the gross wall area. Card 8 does this.
How much extra tile for herringbone? Often 15 to 20%, because every edge tile is cut at an angle.
How many boxes do I need? Divide tiles to order by tiles per box and round up. Card 4 shows the rounding.
Tile Calculator: Work Out How Many Tiles You Need
A tile calculator turns room size, tile size, joint width and waste into tiles, boxes and grout. Formula: area ÷ ((tile length + joint) × (tile width + joint)), rounded up, plus waste. Example: 120 sq ft of 12 × 12 inch tile with a 1/8 inch joint needs 118 tiles, or 130 with 10% waste.
What Is a Tile Calculator?
A tile calculator is an online estimator that converts a surface size into a tile count. It is also called a tile estimator, tiles calculator, tile quantity calculator or tile calc. The free tile calculator on this page returns tiles, boxes, grout, adhesive, cost and installation time in seconds.
It works for any tiled surface. Use it as a floor tile calculator, a wall tile calculator, a bathroom tile calculator or a backsplash tile calculator. It also works as a tile and grout calculator and as a tile square footage calculator.
Enter measurements in metric (square metres, spelled square meters in US English) or imperial (square feet). The tile calculator in feet and the tile calculator in square metres use the same formula. Only the units change.
Three terms matter before you start:
- Waste is the extra tile you buy to cover cuts, breakage and pattern matching. UK pages call it wastage. This tile calculator calls the input the waste allowance.
- Joint is the space between two tiles. It is also called a grout line or grout gap.
- Box is the retail pack. Its tile count lets the calculator round up to whole boxes.
The tool suits homeowners, DIY tilers, landlords, designers and contractors. Ordering too few tiles stalls the job and risks a batch mismatch. Ordering far too many wastes money. A good estimate lands between the two.
Construction and materials estimating calculators turn measured areas and dimensions into the quantities and costs of what to buy. This tile calculator connects measuring tools, grout and flooring calculators, and cost planning in one workflow. Browse the full set of construction calculators for related estimators.
How to Use the Tile Calculator
The tile calculator takes three steps. Each of its 12 cards works alone. Results from one card pre-fill matching fields in the other cards, and a blue “Auto-filled” mark shows which values were carried over. You can override any of them.
- Measure. Pick metric (m, mm) or imperial (ft, in), then enter length and width. For walls, enter length and tiled height.
- Enter tile size and joint. Choose a preset or type your own tile size. Set the joint width, pick a layout and check the waste percentage.
- Read the result. Press Calculate, or press Fill Example to load sample numbers. You get net tiles, tiles to order, boxes, spare tiles and a step-by-step workings panel.
The tool opens with sensible default values, so you only change what differs in your job. The currency selector changes the symbol only. It does not convert prices.
Which card answers which question
People reach this tool through many search phrases: tile estimator, tiles calculator, tiling calculator, calculator for tiles, tile sq ft calculator, square foot tile calculator or tile calculator square feet. The table below maps the common questions to the card that answers them.
| Card | Use it to | Questions it answers |
|---|---|---|
| 1. Basic Tile Calculator | Count tiles and boxes for a room | Floor tile calculator, ceramic tile calculator, tile square footage calculator |
| 2. Waste by Layout Analyzer | Compare layouts and obstacles | Tile waste percentage, how much extra tile |
| 3. Grout Quantity Calculator | Size your grout order | Tile and grout calculator, how much grout do I need |
| 4. Box Rounding and Order Planner | See how waste and whole boxes combine | How many boxes of tile do I need |
| 5. Project Cost Estimator | Build a budget | Tile cost calculator, tile calculator cost |
| 6. Tile Size Comparison | Compare sizes on the same surface | 12×12 tile calculator, large format tile calculator |
| 7. Adhesive and Materials List | List adhesive, primer, spacers, sealant | Thinset and tile adhesive quantity |
| 8. Wall Tiling with Openings | Deduct windows and doors | Wall tile calculator, shower wall tile calculator |
| 9. Layout Cost Optimizer | Compare ten layouts on cost | Herringbone tile calculator, subway tile calculator |
| 10. Joint Width Sensitivity | See joint effects on tiles and grout | Tile spacing calculator, grout gap |
| 11. Room Scenario Estimator | Start from a room type | Bathroom tile calculator, tile backsplash calculator, patio tile calculator |
| 12. Installation Time and Cure Planner | Estimate days and waiting time | How long does tiling take |
Peel and stick tile calculator: use Card 1 with the joint set to 0 mm. Words change by region. UK pages say wastage, metres and joint. US and Canadian pages say waste, square feet and grout line or grout gap. The maths is the same.
Key inputs
| Field | What to enter | Note |
|---|---|---|
| Room length and width | The surface size | Measure to finished edges |
| Tile length and width | The face size of one tile, without the joint | Check the box label, because sizes can be nominal |
| Joint width | The gap between tiles | Choose from 0 to 20 mm (0 to 3/4 in) |
| Layout | One of 25 layouts | Sets a default waste percentage |
| Waste allowance (%) | Extra tiles for cuts and breakage | Editable, and it overrides the layout default |
| Tiles per box | The count printed on the box | Used to round up to whole boxes |
| Tile thickness | Tile depth in mm or inches | Drives grout volume |
| Grout type | Cement, polymer-modified, epoxy and more | Sets grout density in kg per litre |
How to Measure a Room or Wall for Tile
Measuring is the first step of every tile calculation, and most rooms are rectangles. Multiply length by width to get the area in square metres or square feet. Measure to the finished edges of the tiled surface, which means the wall face after plaster or backer board.
Rectangular floors
- Measure twice and record every length in one unit.
- Note the date and keep the sketch for your order.
- Check the total with the square footage calculator in feet, or the square meter calculator in metric.
L-shaped and irregular rooms
Split an L-shaped room into two rectangles. Find each area and add them together. For a triangular bay, use the triangle area calculator. For round or curved areas, use the area of a circle calculator or the semicircle area calculator.
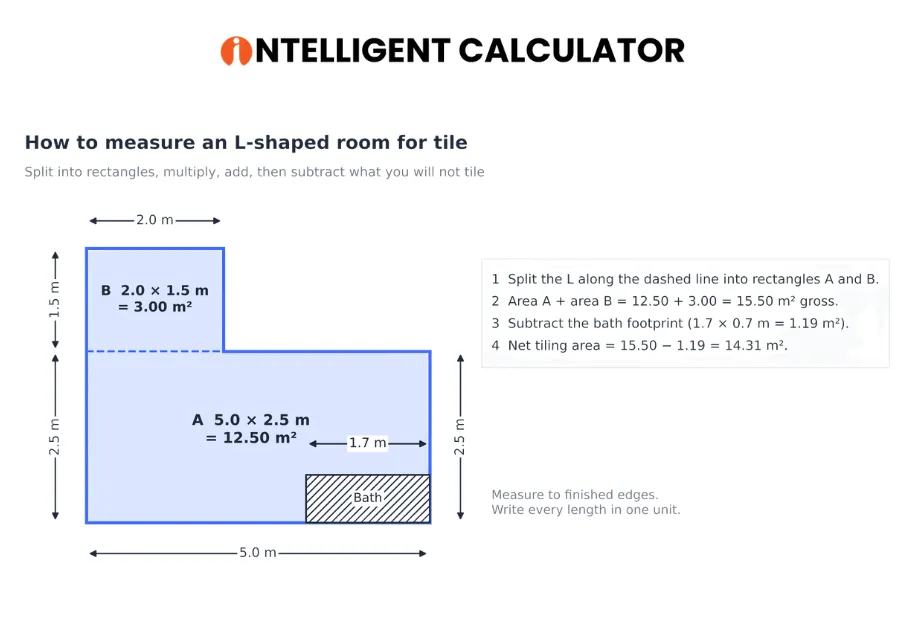
Figure 1. Measuring an L-shaped room for tile: split, multiply, add, then subtract the bath.
Fixed units and walls
Subtract any area you will not tile, such as the footprint of a bath or fixed cabinets. For a wall, multiply wall length by tiled height. Then subtract doors, windows and other cut-outs, capping each opening at the tiled height. Card 8 of the wall tile calculator does this deduction for you.
Measuring mistakes to avoid
- Measuring before the wall finishes are fixed.
- Forgetting to subtract fixed units.
- Mixing feet and metres. The meters to feet converter and the feet and inches converter prevent this.
- Reading millimetre tile sizes as inches. Use the mm to inches converter when a box label differs from your tape.
- Comparing areas in different units. The area converter turns square metres into square feet and back.
Pro tip: Sketch the room first and write every measurement on the sketch. A sketch also shows where to start the first row, which matters for the layout map in Card 1.
How the Tile Calculation Works
The tile calculation has one idea at its core. Each tile takes up its own size plus one joint. That is why the joint sits inside the formula.
The formulas in plain text
- Tiles needed = area ÷ ((tile length + joint) × (tile width + joint)), rounded up.
- Tiles to order = ROUNDUP(tiles needed × (1 + waste %)).
- Boxes = ROUNDUP(tiles to order ÷ tiles per box).
- Grout (litres per m²) = (L + W) × joint × thickness ÷ (L × W), all in mm.
- Grout (kg) = litres per m² × density × area × (1 + waste %).
- Adhesive (kg) = area × notch rate × 1.1.
Always round up. Never round the net count down, because a tile short stalls the job.
Worked example 1: a floor in square feet
You have 120 sq ft and 12 × 12 inch tiles with a 1/8 inch joint. This is the classic “how many 12×12 tiles do I need for 120 square feet” question.
- One tile plus joint covers 12.125 × 12.125 ÷ 144 = 1.021 sq ft.
- 120 ÷ 1.021 = 117.5, so you need 118 tiles.
- Add 10% waste: 118 × 1.10 = 129.8, so you order 130 tiles.
- At 5 tiles per box, 130 tiles is 26 boxes.
For 1/8 inch as a decimal, try the inches to fraction converter.
Worked example 2: a metric room with boxes
A room measures 4.2 m × 3.6 m. The tiles are 300 × 600 mm with a 3 mm joint, laid straight with 10% waste. Each box holds 8 tiles.
- Area = 4.2 × 3.6 = 15.12 m².
- One tile plus joint = 303 × 603 mm = 0.182709 m².
- 15.12 ÷ 0.182709 = 82.75, so you need 83 tiles.
- With waste: 83 × 1.10 = 91.3, so you order 92 tiles.
- Boxes: 92 ÷ 8 = 11.5, so you buy 12 boxes (96 tiles).
You end up with 13 spare tiles. That is 15.7% above the net need, not 10%, because box rounding added the difference.
Worked example 3: a wall with a window
A wall is 3.2 m wide and tiled to 2.4 m high. It has one 1.2 × 1.0 m window. The tiles are 600 × 300 mm with a 2 mm joint and 12% waste.
- Gross wall = 3.2 × 2.4 = 7.68 m².
- Window = 1.2 × 1.0 = 1.2 m².
- Net area = 7.68 − 1.2 = 6.48 m².
- One tile plus joint = 602 × 302 mm = 0.181804 m².
- 6.48 ÷ 0.181804 = 35.6, so 36 tiles.
- With 12% waste: 36 × 1.12 = 40.3, so you order 41 tiles, which is 6 boxes of 8.
Pro tip: At 10% waste the order is 40 tiles, exactly 5 boxes of 8, and the cushion above the net need is 4 tiles. Cuts around a window are tricky, so the sixth box is cheap insurance.
Why the area method can understate small rooms
The area method assumes offcuts are reused. In a small room they often cannot be. Take a 1.3 m × 1.3 m room with 600 × 600 mm tiles, a 2 mm joint and 15% waste. The area method gives 5 net tiles and an order of 6. A grid count needs 3 columns × 3 rows = 9 tiles when no offcut fits elsewhere.
The gap shrinks as rooms grow. A 4.5 m × 3.2 m kitchen with 300 × 600 mm tiles and a 3 mm joint orders 87 tiles by area and 90 in a grid count, with 300 mm tiles running along the 4.5 m side. For rooms under about 5 m², compare both counts and order the higher one. The 5 m² threshold is a rule of thumb, not a published standard.
How Many Tiles Do I Need? Room-by-Room Examples
Card 11 starts from a room type and fills in a typical size and waste allowance. The table uses 300 × 600 mm tiles, a 3 mm joint and 8 tiles per box. A 10 by 12 foot room is 120 sq ft, so use Worked example 1 above: 118 net tiles and 130 to order.
| Room | Area | Waste | Net tiles | Order | Boxes |
|---|---|---|---|---|---|
| Cloakroom (1.6 × 1.2 m) | 1.92 m² | 15% | 11 | 13 | 2 |
| Bathroom floor (2.4 × 1.7 m) | 4.08 m² | 12% | 23 | 26 | 4 |
| Bathroom walls, tiled zone | 6.72 m² | 12% | 37 | 42 | 6 |
| Shower enclosure | 7.56 m² | 15% | 42 | 49 | 7 |
| Kitchen splashback (3.5 × 0.6 m) | 2.10 m² | 12% | 12 | 14 | 2 |
| Hallway (5 × 1.2 m) | 6.00 m² | 12% | 33 | 37 | 5 |
| Kitchen floor (4.5 × 3.2 m) | 14.40 m² | 10% | 79 | 87 | 11 |
| Living room (5.5 × 4.5 m) | 24.75 m² | 10% | 136 | 150 | 19 |
| Patio (5 × 4 m) | 20.00 m² | 10% | 110 | 121 | 16 |
| Stair risers (12 steps) | 1.94 m² | 15% | 11 | 13 | 2 |
In this table, the 4.08 m² bathroom floor needs 23 net tiles and 26 to order, while the 14.40 m² kitchen floor needs 79 net tiles and 87 to order. Small rooms get a higher waste allowance because cuts are a bigger share of a small floor.
Tile size changes every number. With larger 600 × 600 mm tiles and a 2 mm joint, a 1.6 m × 1.2 m cloakroom needs 6 net tiles (7 to order) and a 4.5 m × 3.2 m kitchen needs 40 net tiles (44 to order).
Bathroom tile calculator: floor, walls and shower
Treat a bathroom as three separate calculations: floor, walls and shower. Use Card 1 for the floor and Card 8 for walls with openings. A shower with curves or niches uses about 20% waste, because every niche creates small shaped cuts.
Backsplash tile calculator: the kitchen splashback
A kitchen splashback is a long, shallow wall strip. Enter its length and height, then deduct outlets, windows and the cooker hood zone. Subway tile in a brick layout uses 10% waste.
Wall tile calculator: openings and tiled height
A wall tile calculator must deduct doors and windows. Card 8 caps each opening at the tiled height and shows the result as a waterfall from gross wall to the area you order.
Patios and outdoor tile
Outdoor tile follows the same formula as indoor tile. For concrete pavers rather than tile, use the paver calculator.
Stairs
Risers and treads create many small cut pieces, so the tool uses 15% waste. Plan edge trims for the nosing. Use the stair calculator beside Card 11 to get riser heights and the number of steps.
Case study: an 8 × 10 ft bathroom
A bathroom floor is 8 × 10 ft, or 80 sq ft. The tiles are 12 × 24 inches with a 1/8 inch joint.
- One tile plus joint = 12.125 × 24.125 ÷ 144 = 2.03 sq ft.
- 80 ÷ 2.03 = 39.4, so you need 40 tiles.
- At 10% waste you order 44. At 15% you order 46.
A bathroom has a toilet, a vanity and a door, and each adds cuts. The 15% figure is the safer choice. If a box holds 8 tiles, 46 tiles is 6 boxes, or 48 tiles.
How Much Extra Tile Should You Buy? Waste by Layout
The tile waste percentage is the extra tile you buy beyond the net count. Waste, also called wastage or the waste allowance, covers cuts at walls, breakage, pattern matching and tiles you reject for chips or shade. The right percentage depends mostly on layout.
Why layout drives waste
A straight grid cuts tiles only at the walls. A diagonal layout cuts a tile at an angle along every wall, and herringbone cuts angled tiles at both ends. Angled cuts leave offcuts that rarely fit anywhere else. Long tiles laid with a 33% offset and with a 50% offset can also differ in cuts, so the calculator lets you edit the allowance directly.
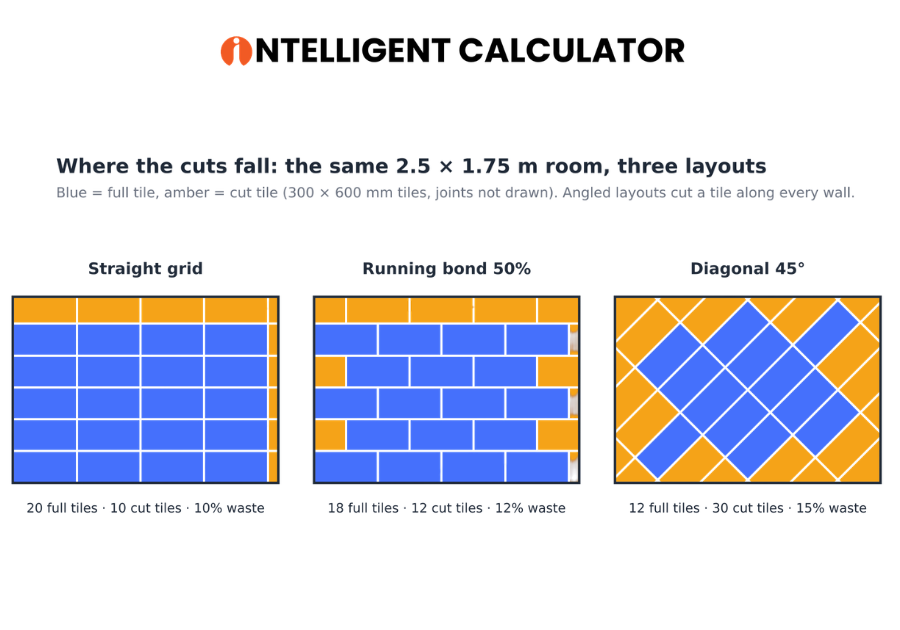
Figure 2. Where the cuts fall in the same room: 10 cut tiles in a straight grid, 12 in running bond, 30 on the diagonal.
| Layout | Waste used | Why |
|---|---|---|
| Minimum, perfect square room | 5% | Almost no cuts |
| Mosaic sheets | 5% | Each sheet covers many small tiles |
| Straight grid (stack bond) | 10% | Cuts only at the walls |
| Brick or subway offset | 10% | Cuts at row ends |
| Running bond, 50% offset | 12% | More end cuts |
| Hexagon | 12% | Edge cuts leave partial shapes |
| Large format straight (over 600 mm) | 12% | Each cut wastes more |
| Diagonal 45° | 15% | Every edge tile is cut at an angle |
| Stair risers and treads | 15% | Many small cut pieces |
| Many cut-outs, complex room | 18% | Pipes, niches and corners |
| Herringbone | 18% | Angled cuts at both ends |
| Herringbone 45° | 20% | Angled pattern plus diagonal edges |
| Chevron | 20% | Matched point cuts |
| Shower with curves or niches | 20% | Many small, shaped cuts |
In this calculator’s defaults, a straight layout adds 10% waste, a 50% running bond 12%, a diagonal layout 15%, herringbone 18% and chevron 20%. These are adjustable planning assumptions. They are common trade figures, not values from a named standard, so confirm them with your tile maker or installer. For other floor types, use the flooring calculator for other floor types.
Same room, five layouts
The 15.12 m² room has 83 net tiles with 300 × 600 mm tiles, a 3 mm joint and 8 tiles per box.
| Layout | Waste | Tiles to order | Boxes |
|---|---|---|---|
| Straight grid | 10% | 92 | 12 |
| Running bond 50% | 12% | 93 | 12 |
| Diagonal 45° | 15% | 96 | 12 |
| Herringbone | 18% | 98 | 13 |
| Chevron | 20% | 100 | 13 |
Going from straight to chevron adds 8 tiles, which is about one extra box. Labour matters more than tile here. Card 9 assumes herringbone takes 1.5 times the labour of a straight layout and chevron 1.6 times, so choose a complex pattern for looks, not savings.
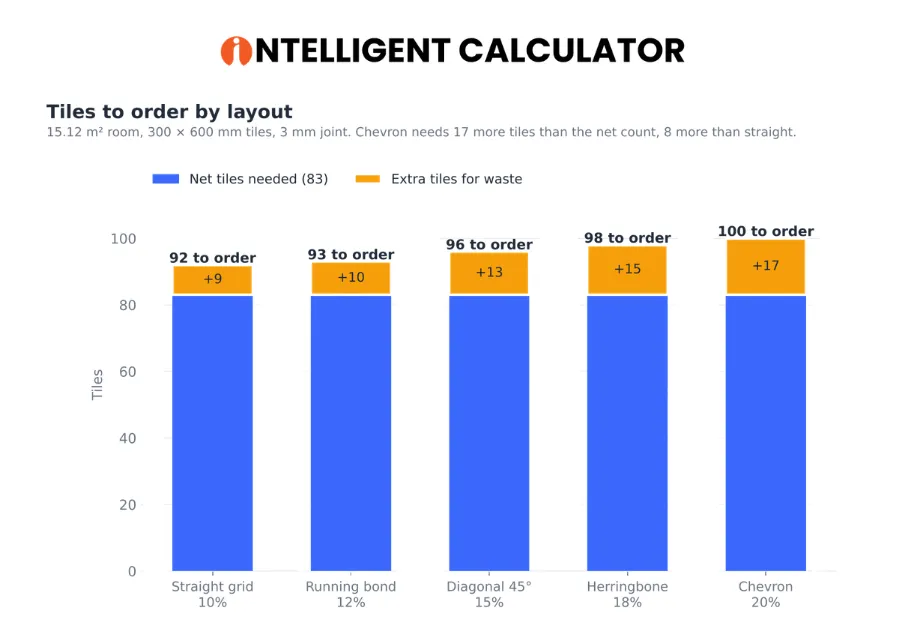
Figure 3. Tiles to order by layout for the 15.12 m² room: waste adds 9 tiles for a straight grid and 17 for chevron.
Other layouts follow the same logic. Brick or subway orders 92 tiles like a straight grid, hexagon orders 93 and a Versailles pattern orders 96.
Tile Size and Joint Width Guide
Bigger tile means fewer tiles, fewer joints and more cutting waste. Card 6 compares sizes on the same surface. The table uses a 15.12 m² floor, a 3 mm joint and 10% base waste. The calculator adds up to 8% for large formats, because each cut on a big tile wastes more. That premium is an adjustable planning assumption.
| Tile size (mm) | Net tiles | Effective waste | Tiles to order | Area bought |
|---|---|---|---|---|
| 100 × 100 | 1,426 | 10.0% | 1,569 | 15.69 m² |
| 300 × 300 | 165 | 10.0% | 182 | 16.38 m² |
| 300 × 600 | 83 | 10.9% | 93 | 16.74 m² |
| 600 × 600 | 42 | 12.7% | 48 | 17.28 m² |
| 800 × 800 | 24 | 15.5% | 28 | 17.92 m² |
| 600 × 1200 | 21 | 16.3% | 25 | 18.00 m² |
| 1200 × 1200 | 11 | 18.0% | 13 | 18.72 m² |
For a 15.12 m² floor with a 3 mm joint, 300 × 300 mm tiles need 165 net tiles, 300 × 600 mm tiles need 83, 600 × 600 mm tiles need 42 and 600 × 1200 mm tiles need 21. The 1200 × 1200 option buys about 3 m² more tile than the 100 × 100 option. Fewer tiles do not mean less material.
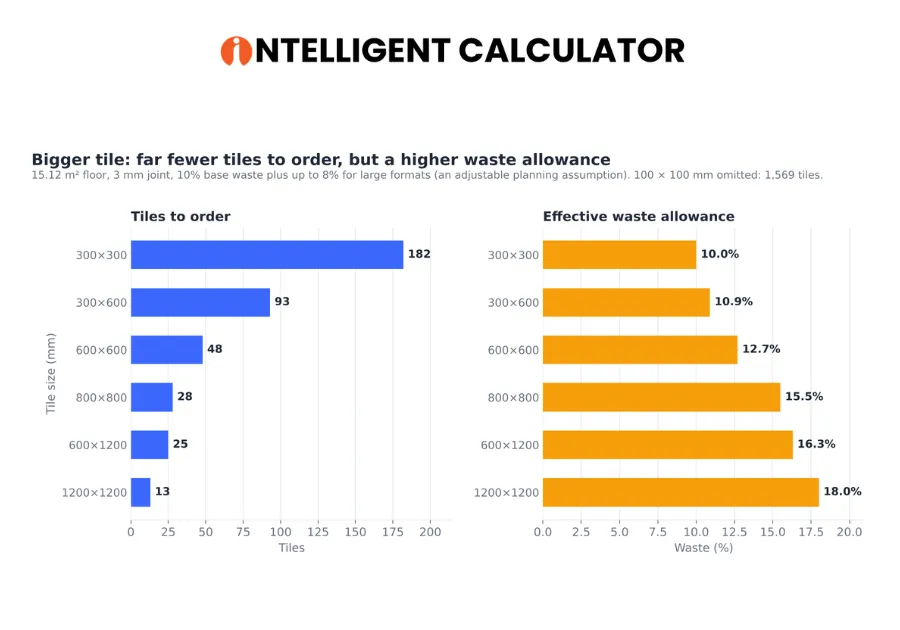
Figure 4. Tile size comparison: larger tiles mean far fewer tiles to order and a higher waste allowance.
How joint width changes the tile count
A wider joint lets each tile cover more area, so fewer tiles fit. It also uses much more grout. Card 10 shows both effects together. The table uses 15.12 m², 300 × 600 mm tiles, 10 mm thick, cement grout at 1.6 kg per litre and no waste.
| Joint | Net tiles | Grout needed | Joint share |
|---|---|---|---|
| 0 mm | 84 | 0 kg | 0% |
| 2 mm | 84 | 2.42 kg | 1.0% |
| 3 mm | 83 | 3.63 kg | 1.5% |
| 5 mm | 82 | 6.05 kg | 2.5% |
| 10 mm | 80 | 12.10 kg | 5.0% |
Moving from a 3 mm to a 10 mm joint saves 3 tiles but adds about 8.5 kg of grout. The calculator labels a joint share under 3% as tight, 3% to 8% as normal and over 8% as wide. Tile thickness does not change the tile count, but it does change grout volume.
What joint width should you use?
There is no single standard joint. It depends on the tile, its edge finish and the maker’s guidance. Many installers start near 1/8 inch (3 mm), but check the data sheet before you decide.
Rectified, calibrated and large-format tile
- Rectified tile has machine-cut, square edges. Installers can use narrower joints with it.
- Calibrated tile is sorted into groups of the same actual size, usually marked by a caliber code on the box. Buy one caliber code, as you would buy one batch.
- Large-format tile is over about 600 mm on a side. It needs a flatter substrate, back-buttering of the adhesive and often two people to lay.
- Lippage is the height difference between neighbouring tile edges. Large tiles show it more, so check substrate flatness first.
- Movement joints are soft joints that let tile expand and contract at perimeters and across big areas. Follow the manufacturer and the current edition of the TCNA Handbook (US) or BS 5385 (UK).
How Many Boxes of Tile Do You Need?
To find how many boxes of tile to buy, divide tiles to order by tiles per box and round up. You cannot buy part of a box. Box coverage is tiles per box × the area of one tile face. For a box of eight 300 × 600 mm tiles, coverage is 8 × 0.18 = 1.44 m², so 12 boxes cover 17.28 m². Check the box label, because box sizes differ.
Rounding changes your real waste
In Worked example 2, the 10% rule asked for 92 tiles. Boxes of 8 forced 96. One box fewer would give 88 tiles, only 5 above the net need of 83, which is tight for cutting.
Box size changes the result. At 5 tiles per box, 92 tiles is 19 boxes, so you buy 95 tiles. That is 12 tiles above the net need, or 14.5% extra, not 10%. Card 4 shows this flow from net need, through waste and rounding, to tiles bought.
Batch numbers and spare tiles
Tiles from different production runs can differ slightly in shade and size. Each run has a lot or batch number on the box. Buy everything from the same batch, and confirm all boxes match before you pay.
Keep a few unopened tiles after the job. If a tile cracks years later, a spare from the same batch will match. Record the batch number with your receipt. Do not return opened boxes unless the shop allows it. Use leftover tiles for repairs, a small shelf or a test cut.
How Much Grout Do You Need?
Grout fills the joints between tiles. Joint width, grout gap and grout line all mean the same thing. Three inputs drive the amount: joint width, tile size and tile thickness. Card 3 uses the geometry of the joint, so it is more exact than a flat rule per square metre.
Example: a 15.12 m² floor of 300 × 600 mm tiles, 10 mm thick, with 3 mm joints. The grout is polymer-modified at 1.7 kg per litre. Add 10% waste.
- Litres per m² = (300 + 600) × 3 × 10 ÷ (300 × 600) = 0.15 L.
- Weight per m² = 0.15 × 1.7 = 0.255 kg.
- Total = 0.255 × 15.12 × 1.10 = 4.24 kg.
- That fits one 5 kg bag, with the bag about 85% used.
With standard cement grout at 1.6 kg per litre, the same floor needs 3.99 kg, which is also one 5 kg bag. A small job leaves most of a bag unused, so bag rounding matters more than the exact kilograms.
Grout by tile size
Smaller tiles need much more grout. The table uses a 3 mm joint, 10 mm thickness and 1.7 kg per litre.
| Tile size (mm) | Grout per m² | Weight per m² | Joint share |
|---|---|---|---|
| 100 × 100 | 0.60 L | 1.02 kg | 6.0% |
| 200 × 200 | 0.30 L | 0.51 kg | 3.0% |
| 300 × 300 | 0.20 L | 0.34 kg | 2.0% |
| 300 × 600 | 0.15 L | 0.26 kg | 1.5% |
| 600 × 600 | 0.10 L | 0.17 kg | 1.0% |
| 600 × 1200 | 0.075 L | 0.13 kg | 0.75% |
A 100 mm tile uses four times the grout of a 300 × 600 mm tile. Thicker tiles raise every number in the table.
Grout by joint width
For 300 × 600 × 10 mm tile at 1.6 kg per litre, grout rises in direct proportion to joint width.
| Joint | Litres per m² | kg per m² |
|---|---|---|
| 2 mm | 0.10 | 0.16 |
| 3 mm | 0.15 | 0.24 |
| 4 mm | 0.20 | 0.32 |
| 5 mm | 0.25 | 0.40 |
For this tile, a 2 mm joint needs 0.16 kg per square metre and a 5 mm joint needs 0.40 kg. For a quick second check, use the grout calculator.
Grout types and density
The calculator converts litres to kilograms with a density that depends on the grout type: cement unsanded 1.4, pre-mixed paste 1.5, urethane 1.5, standard cement 1.6, epoxy 1.6, polymer-modified 1.7, sanded cement 1.75 and wide-joint 1.8 kg per litre. These are planning assumptions without a named source.
Warning: Epoxy and cement mixes yield differently, and mix ratio changes the final quantity. Always check the maker’s data sheet.
Tile Types and What Else to Buy
Pick the tile type first. Then enter its real size and thickness, because both feed the calculator.
Tile types and materials
- Ceramic and porcelain are the most common tiles. Porcelain is denser and absorbs less water than ceramic, so it suits wet areas and outdoor use. Check the maker’s slip-resistance rating for floors in wet areas.
- Natural stone includes marble, granite and slate. It varies in shade and thickness, so lay it out dry first and allow extra.
- Glass mosaic and subway tile are common on walls and backsplashes. Mosaic sheets carry many small tiles, so count sheets rather than tiles.
- Stone veneer is a thin stone facing for feature walls.
The shopping list after the tile count
Tiles are only part of the order. Card 7 lists the rest. For the 15.12 m² room, using a 12 mm notch trowel (4.8 kg per m²), it returns:
| Item | Quantity | How it is worked out |
|---|---|---|
| Adhesive | 79.8 kg, so 4 bags of 20 kg | Area × 4.8 kg × 1.1 |
| Primer | About 2.3 litres | 0.15 L per m² |
| Spacers | 1 pack of 100 | 83 tiles × 1.15 = 96 spacers |
| Sealant | 2 cartridges | Perimeter ÷ 8 m per cartridge |
Adhesive bonds tiles to the surface. In the US, cement-based tile adhesive is usually called thinset mortar, and some pages say tile mortar. The product data sheet tells you which type suits your tile and substrate. Trowel notch size changes adhesive use a lot, so match it to your tile size. Back-butter large tiles for full contact. For bedding or screed work, use the cement calculator.
Trims, skirting and preparation materials
- Trims and bullnose finish exposed edges and outside corners. They are sold by length, so measure every exposed edge. The linear foot calculator helps when you work in feet.
- Skirting tiles run along the base of the wall. The example room has a 15.6 m perimeter. Minus a 0.9 m doorway that leaves 14.7 m, and 14.7 ÷ 0.6 = 24.5, so you need about 25 pieces of 600 mm.
- Underlayment and backer board give tile a flat, firm base.
- Waterproofing membrane keeps water out of the substrate in showers and wet rooms. This calculator does not size it.
- Decoupling membrane lets tile move independently of the subfloor.
- Self-leveling compound flattens an uneven floor before tiling.
- Under-tile heating must be planned before you set tile.
How Long Does Tiling Take, and What Does It Cost?
Card 12 turns area and tile class into labour hours, and Card 5 builds a budget. Both use editable planning assumptions. The numbers below use the calculator’s example inputs, so they are not market data.
How long will it take?
For the 15.12 m² floor, with 300–450 mm tiles laid straight at 1.5 m² per hour:
- Surface prep: 3.0 hours
- Tiling: 10.1 hours
- Grouting: 3.8 hours
- Clean and seal: 1.5 hours
- Total: about 18.4 labour hours
One tiler working 8-hour days needs about 2.3 working days. Two tilers need about 1.2 days. Waiting time comes on top: Card 12 defaults to 24 hours before grouting and 72 hours of grout cure before foot traffic. Adding a second tiler cuts working days but not cure times. Use the data sheet, not our default.
What does a tiling job cost?
Card 5 stacks tile, adhesive, grout, labour, preparation, contingency and tax. The example prices are 28 per m² for tile, 18 per 20 kg bag of adhesive, 15 per 5 kg bag of grout, 35 per m² for labour and 8 per m² for preparation. Contingency is 10%.
| Line | Amount (example) |
|---|---|
| Tiles (16.63 m² at 28 per m²) | 465.70 |
| Adhesive (4 bags) and grout (2 bags) | 102.00 |
| Labour and preparation | 650.16 |
| Contingency (10%) | 121.79 |
| Total | 1,339.64 |
That is about 88.60 per m². Materials are 47% of the subtotal, and labour and preparation are 53%. Card 5 uses a flat grout rate, so it shows 2 grout bags where Card 3 shows 1. Use Card 3 for the better grout figure.
Replace each price with a dated, local quote, and get two or three written quotes from installers. This guide publishes no regional price ranges because it has no sourced data for them yet.
Warnings for wet areas, subfloors and stairs
- Showers and wet rooms. Waterproofing matters more than the tile count. Follow the manufacturer’s system and your local building rules. A curb-less shower also needs a correctly sloped floor, so hire a qualified tiler.
- Subfloors. A tile floor needs a flat, firm base. The contingency line covers surprises such as an uneven floor, but it does not price them exactly.
- Under-tile heating. Cure times can change with heating, so follow both product data sheets.
- Stairs. Plan edge trims for the nosing, and expect many small cuts.
Common Mistakes, Pro Tips and Limits
Common mistakes when ordering tiles
- Leaving the joint out. For 100 mm tiles at a 3 mm joint, you would order about 6% too many (1,512 net tiles instead of 1,426).
- Not rounding up to whole boxes. A fraction of a box does not exist.
- Using one waste figure for every layout. Herringbone needs far more than a straight grid.
- Ignoring small-room effects. Compare the area count with a grid count.
- Mixing batches. Shade and size can differ between production runs.
- Forgetting openings on walls. Windows and doors change the net area.
- Skipping spares. You will want a few matching tiles for repairs.
- Treating an estimate as a quote. Confirm quantities with your supplier.
Pro tips
- Buy all tiles from one batch and keep a few unopened spares.
- Dry-lay a row of tiles before you order, so the start line avoids thin slivers at the walls. Tile from the centre or from a visible edge.
- Test any tool with a number you can work out by hand. A second check of any printed example is a good habit.
What this calculator does not model
- Trims, bullnose and edging pieces.
- Pattern repeats and matching across tiles.
- Shade variation between boxes.
- Uneven floors and crooked walls.
- Irregular rooms. Split odd shapes into rectangles first.
- Offcut reuse. The area method assumes it, as shown in the small-room example.
- Waterproofing and substrate preparation quantities.
- Sealant perimeter beyond a square-room assumption in Card 7.
- Layout maps beyond 60 columns or rows.
Tile Terms Explained
| Term | Meaning |
|---|---|
| Tile calculator / tile estimator | A tool that turns surface size into a tile count |
| Joint width (grout gap, grout line) | The space between tiles that grout fills |
| Grout | The material that fills the joints |
| Tile thickness (depth) | How thick one tile is, which affects grout volume |
| Waste factor (wastage, waste allowance) | Extra tiles bought for cuts and breakage |
| Box coverage | The area one box of tiles covers |
| Lot or batch number | A code that marks one production run |
| Adhesive (thin-set, thinset mortar, tile mortar) | The cement-based glue that bonds tile to the surface |
| Spacers | Small plastic pieces that hold joints even |
| Trims and edging | Profiles that finish exposed tile edges |
| Skirting tiles | Tile pieces fixed along the base of a wall |
| Backsplash | The tiled strip behind a sink or cooker |
| Rectified tile | A tile cut to precise, square edges |
| Calibrated tile | A tile sorted into a group of the same actual size |
| Large format | A tile over about 600 mm on a side |
| Stack bond | A straight grid with joints that line up |
| Running bond | A layout where each row is offset from the next |
| Cut-outs | Doors, windows, niches and fixtures you tile around |
| Lippage | The height difference between neighbouring tile edges |
| Movement joint | A soft joint that lets tile expand and contract |
| Waterproofing membrane | A layer that keeps water out of the substrate |
| Decoupling membrane | A layer that lets tile move independently of the subfloor |
| Self-leveling compound | A liquid that flattens an uneven floor before tiling |
| Under-tile heating | Electric or water heating installed below the tile |
| m² and sq ft | Square metre and square foot. 1 m² is about 10.76 sq ft |
For area conversions, use the area converter. More terms live in our glossary.
Frequently Asked Questions
How do I calculate how many tiles I need for a room?
Measure the room’s length and width and multiply them to get the area. Divide that area by the size of one tile plus its joint, then round up. Add a waste allowance and round up again. The tile calculator does all three steps at once.
How many extra tiles should I buy?
Plan on about 10% extra for a straight layout. Use 15% or more for diagonal, and 18% to 20% for herringbone or chevron. Small rooms and rooms with many cuts need more. These are planning assumptions, so confirm them with your tile maker or installer.
How many 12×12 tiles do I need for 120 square feet?
With a 1/8 inch joint, you need about 118 tiles net. Add 10% waste and you order 130 tiles. Without any joint, the net count would be 120, so the joint changes the answer slightly.
How many tiles do I need for 100 square feet?
For 12 × 12 inch tiles with a 1/8 inch joint, 100 square feet needs 98 tiles net. With 10% waste you order 108 tiles. Other tile sizes change the count, so enter your own size in the tile calculator.
How many tiles are in a box?
The count depends on the tile size and the maker, and it is printed on the box label. For example, a box of eight 300 × 600 mm tiles covers 1.44 m². Enter that count in the tiles per box field so the calculator rounds up to whole boxes.
How many boxes of tile do I need?
Divide tiles to order by tiles per box and round up. A 15.12 m² room needs 92 tiles with 10% waste. At 8 per box, that is 12 boxes, or 96 tiles. Check the box label for coverage, because box sizes differ.
How much grout do I need for my tiles?
Grout depends on joint width, tile size and tile thickness. A 15.12 m² floor of 300 × 600 mm tiles, 10 mm thick with 3 mm joints, needs about 4.2 kg with 10% waste. That is one 5 kg bag. Smaller tiles need much more per square metre.
How much grout do I need for 100 square feet of tile?
100 square feet is about 9.29 m². For 300 × 300 mm tiles, 10 mm thick with 3 mm joints and grout at 1.7 kg per litre, you need 0.34 kg per m², about 3.2 kg. With 10% waste that is about 3.5 kg, so one 5 kg bag.
What is the standard grout gap for floor tiles?
There is no single standard. The right joint depends on the tile type, its edge finish and the maker’s guidance. Many installers start near 1/8 inch (3 mm). Rectified tiles often allow narrower joints, and rustic tiles need wider ones. Check the data sheet.
Do I include grout lines when calculating tiles?
Yes. Each tile takes up its own size plus one joint. The calculator adds the joint to both tile dimensions. The effect is small for large tiles and bigger for small ones, such as about 6% for 100 mm tiles at a 3 mm joint.
How do I calculate tiles for a wall with a window?
Multiply the wall length by the tiled height. Subtract the window area and any door or cut-out areas. Then divide the net area by the tile-plus-joint area, add waste and round up. A 3.2 m × 2.4 m wall with a 1.2 m × 1.0 m window has 6.48 m² net, which needs 36 tiles of 600 × 300 mm, or 41 with 12% waste.
How much extra tile do I need for herringbone?
Plan on 15% to 20%. The tool uses 18% for standard herringbone and 20% for herringbone at 45 degrees. Every edge tile is cut at an angle, and offcuts are harder to reuse.
How many extra tiles do I need for a diagonal layout?
About 15% is a common allowance. A diagonal layout cuts every tile along the walls. For a 15.12 m² room, 15% turns 83 net tiles into 96 to order.
Do I need extra tile for a small bathroom?
Yes. Cuts are a bigger share of a small floor, so use 12% to 15%. Also compare the area count with a grid count. A 1.3 m × 1.3 m room orders 6 600 × 600 mm tiles by area but needs 9 when offcuts cannot be reused.
How many 12 x 24 inch tiles do I need for a shower wall?
For a 5 ft × 8 ft shower wall (40 sq ft) with a 1/8 inch joint, one tile plus joint covers 2.03 sq ft. That gives 20 tiles net. With 15% waste for a shower, order 23 tiles.
Can I mix tiles from different batches?
Avoid it. Tiles from different production runs can differ in shade and size. Buy all your tiles from one batch, check the lot number on every box and keep a few unopened spares.
How long should tile adhesive dry before grouting?
It depends on the product, the tile and the substrate. Card 12 uses 24 hours before grouting as an editable default. The adhesive’s data sheet overrides that default.
Is a tile estimator the same as a tile calculator?
Yes. A tile estimator, tile calculator and tiles calculator all convert a surface size into a tile count. This tool also estimates boxes, grout, adhesive, cost and installation time.
Can I use this tile calculator for peel and stick tiles?
Yes, for area and tile count. Set the joint to 0 mm if your tiles butt together, and check the pack coverage. Ignore the grout and adhesive results, because peel and stick tiles do not use them.
How accurate is the tile calculator?
It follows the formulas printed in this guide, and every example here was rechecked outside the tool. Real jobs differ because of crooked walls, tile defects and box sizes. Treat the result as a strong estimate and confirm quantities with your supplier or installer.
Related Calculators and Guides
Use these calculators beside the tile calculator. Together they cover measuring, other materials and unit conversion.
- Flooring calculator for other floor types
- Square footage calculator to measure surface area in feet
- Square meter calculator to measure surface area in metric
- Square yards calculator for larger areas
- Grout calculator for a standalone grout estimate
- Cement calculator for bedding and screed
- Paint calculator for the walls above your tile
- Paver calculator for patios and paths
- Stair calculator for steps and risers
- Carpet calculator if you are comparing floor options
- Brick calculator for brick walls
- Linear foot calculator for trim and edging lengths
- Triangle area calculator for angled rooms
- Area converter for square metres and square feet
- Percentage calculator and percentage increase calculator to test waste percentages
- cm to inches converter for tile sizes in centimetres
- All construction calculators
Test set: five cases you can check by hand
| Case | Inputs | Result |
|---|---|---|
| 1. Floor in feet | 120 sq ft, 12 × 12 in tile, 1/8 in joint, 10% waste, 5 per box | 118 net, 130 to order, 26 boxes |
| 2. Metric room | 4.2 × 3.6 m, 300 × 600 mm tile, 3 mm joint, 10% waste, 8 per box | 83 net, 92 to order, 12 boxes |
| 3. Wall with window | 3.2 × 2.4 m, one 1.2 × 1.0 m window, 600 × 300 mm tile, 2 mm joint, 12% waste, 8 per box | 36 net, 41 to order, 6 boxes |
| 4. Small room | 1.3 × 1.3 m, 600 × 600 mm tile, 2 mm joint, 15% waste | 6 by area method, 9 by grid count |
| 5. Grout | 15.12 m², 300 × 600 × 10 mm tile, 3 mm joint, 1.7 kg per litre, 10% waste | 4.24 kg, one 5 kg bag |
Sources
Read your tile maker’s installation guide and product data sheets first. Two published references to consult are the TCNA Handbook for Ceramic, Glass and Stone Tile Installation (US) and the BS 5385 series (UK). Check the current edition before relying on any clause. This guide cites no clause numbers. Waste percentages, grout densities, trowel notch rates, labour hours and cure times are unsourced planning assumptions until a named source is added.
Conclusion
A tile calculator turns a few measurements into a confident order. Measure the surface, add the joint to the tile size, apply a waste allowance that fits your layout and round up to whole boxes.
Layout, tile size and joint width change your numbers more than most people expect. Small tiles use far more grout. Large tiles buy more area. Diagonal and herringbone layouts add a box or more. Use the tile calculator for tiles, boxes, grout, adhesive, cost and time, then check the result with your supplier or installer before you buy.